Guy's Big Bite: A McConaughey and Fieri Feast
This episode aired Saturday, December 18 but I just watched it this morning as I am slowly catching up on my DVR taped Food Network shows. I really enjoyed this one hour Guy's Big Bite: A McConaughey and Fieri Feast and the recipes Matthew and Guy made looked delicious. To start things off Matthew made This Rum Ting drink for Guy and him while they cooked up Matthew's Malibu Oysters, JKL Pesto Pork and Veggie Roast, Soy Glazed Green Beans, and Farro Salad with Citrus Vinagrette. To compliment their food, Matthew made another drink Just Keep Livin' Margarita. You can find all the recipes from this episode on the Food Network site: http://www.foodnetwork.com/.
In between Matthew and Guy's cooking feast they shared stories about Guy coming over to Matthew's place in Malibu and cooking for hours and jamming on drums. Matthew also shared a little bit about his family, and the nonprofit he started Keep On Livin' which offers after school programs that teach teens healthy living and exercise in their lives. Guy and Matthew shared real nice chemistry and seemed to enjoy cooking together and chatting it up for the camera to die hard Guy Fieri fans like me. I am also happy they changed the intro for Guy's Big Bite - it's rockin' just like Guy!
-Sophia/Two Frys

Friday, December 31, 2010
Tuesday, December 28, 2010
Barefoot Contessa's How Easy Is That? Cookbook Review
Barefoot Contessa's How Easy Is That? Cookbook Review
One of the Christmas presents my husband got me was Ina Garten’s new cookbook Barefoot Contessa How Easy Is That? Fabulous Recipes & Easy Tips. I started reading the cookbook last night, and finished it this morning and am so excited to try these recipes. Ina offers helpful tips and makes thoughtful recommendations on equipment and kitchen stuff one should have handy and gadgets she does not bother owning. Most of us do not have an enormous kitchen as Ina has to stock everything we would like, but everything she recommends is practical and can work even in small kitchens like mine. Some pots I have not purchased yet since they are so expensive, but Ina offers affordable alternatives. There are 68 easy tips and some I already do, but Ina has given me new ideas for my kitchen space. I also love the Contessa's simple pictures of beautiful place settings for her dining table.
The recipes are simple, sound delicious, and the pictures are beautiful. I have seen some of these recipes on the Food Network already and remember wishing there were such a thing as smellavision. The book has six main sections cocktails, starters, lunch, dinner, vegetables and desserts. If you love to entertain friends and family, this cookbook is a treasure trove. The recipes are also perfect for family dinners or just for two as in my case. I have made many Ina recipes and they always come out great so I am eager to make many of the ones in this cookbook.
The main theme of the cookbook is the word "easy." Ina is keeping it simple by using easy ingredients, providing easy shortcuts, easy techniques, easy menus and easy recipes. I cannot wait to make Foie Gras With Roasted Apples, Roasted Vegetable Frittata, Tarragon Potato Salad, Greek Lamb With Yogurt Mint Sauce, Spaghetti Aglio E Olio, Easy Parmesan "Risotto," Sausage Stuffed Mushrooms, Chocolate Pudding Cream Tart and Strawberry Rhubarb Crisp. I want to make so many other recipes as well but I will make these recipes first.
-Sophia/Two Frys
 |
| Ina Garten - How Easy Is That? |
The recipes are simple, sound delicious, and the pictures are beautiful. I have seen some of these recipes on the Food Network already and remember wishing there were such a thing as smellavision. The book has six main sections cocktails, starters, lunch, dinner, vegetables and desserts. If you love to entertain friends and family, this cookbook is a treasure trove. The recipes are also perfect for family dinners or just for two as in my case. I have made many Ina recipes and they always come out great so I am eager to make many of the ones in this cookbook.
The main theme of the cookbook is the word "easy." Ina is keeping it simple by using easy ingredients, providing easy shortcuts, easy techniques, easy menus and easy recipes. I cannot wait to make Foie Gras With Roasted Apples, Roasted Vegetable Frittata, Tarragon Potato Salad, Greek Lamb With Yogurt Mint Sauce, Spaghetti Aglio E Olio, Easy Parmesan "Risotto," Sausage Stuffed Mushrooms, Chocolate Pudding Cream Tart and Strawberry Rhubarb Crisp. I want to make so many other recipes as well but I will make these recipes first.
-Sophia/Two Frys
Monday, December 27, 2010
Darkened Red Velvet Snowball Cake
Darkened Red Velvet Snowball Cake
This is the first time I made a red velvet cake, but I did not want to follow a traditional recipe or use cream cheese frosting since I use this frosting on Ina Garten's Coconut Cake that I often make for my loved ones. On Christmas morning, I made this Darkened Red Velvet Snowball Cake for my hubby and me. I love the richness, better taste, and color of dark chocolate cake so I used dark instead of milk chocolate hence the darker red color. I used the cake recipe ingredients from Redbook Magazine www.redbookmag.com/recipefinder/red-velvet-snowball-cake-recipe but not the cream cheese frosting. For the frosting, I made a Fluffy White Frosting from http://www.cooks.com/ so you can go there and search for "fluffy white frosting" and pick the recipe you like best.
I used Mounds Sweetened Coconut Flakes for the top of the cake and loved the taste and freshness of the coconut flakes. The Redbook recipe divided each 9 inch cake layer in half so you have four layers, but I kept mine a two layer cake. When you frost the cake, be sure to let it set for at least three hours before you serve it. I think this is the moistest cake I have ever made with dark chocolate in the mixture. It is so delicious and beautiful as well.
Enjoy!
-Sophia/Two Frys
 |
| Darkened Red Velvet Snowball Cake |
 |
| Slice of Darkened Red Velvet Cake |
Enjoy!
-Sophia/Two Frys
Sunday, December 26, 2010
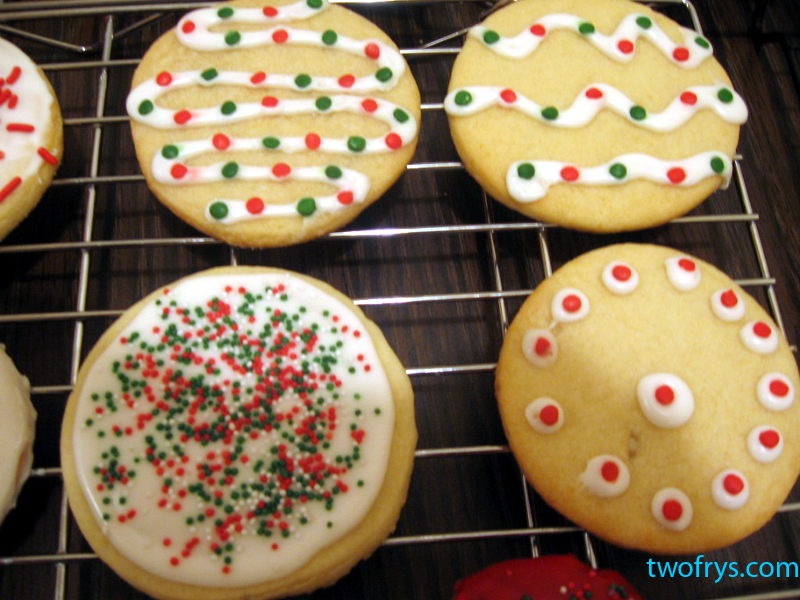
Holiday Cookie Baking
Holiday Cookie Baking
I did not finish final exams and papers until December 20th, so I only had a few days to do Christmas gift shopping and holiday baking. Needless to say, I am still tired and recovering but am thrilled it is my final semester of classes and next semester is all about the thesis and graduating. Phew... Baking cookies I find takes a lot of preparation, patience and space. My kitchen is very small so this was a major challenge. On December 23rd, I spent nine hours baking and decorating cookies. I found it relaxing and had fun!
 |
| Decorating Icing, I didn't use the color dyes but had them out just in case I needed them |
 |
| Betty Crocker Decorating Icing |
 |
| Some of my gingerbread cooling |
 |
| My funky snowmen! |
 |
| Assorted cookies drying |
 |
| Gingerbread boys and girls |
 |
| Gingerbread men |
 |
| Tree Ornaments |
 |
| Stars! |
 |
| Decorated icicles and stars |
 |
| Christmas Trees |
 |
| Hearts |
Enjoy!
-Sophia/Two Frys
Wednesday, December 8, 2010
Pillsbury Christmas Tree Shape Sugar Cookies
Pillsbury Christmas Tree Shape Sugar Cookies
I have to give all the credit to Pillsbury for their Ready To Bake Christmas Tree Shape Sugar Cookies. Hubby bought these to see if we would like them. They are delicious and there's hardly any work involved except for placing the dough onto two cookie sheets. Place the cookies about two inches apart and follow baking instructions. Keep an eye on the temperature for your oven and monitor them since they bake super fast between eight and ten minutes. Just cool the cookies for a few minutes and transfer them to a serving tray. If you want to place them in a cookie tin or your favorite cookie jar wait until they cool completely or they will break apart. I broke two and had to eat them immediately since I was being impatient. That's all there is to it.
If you are planning holiday festivities you can buy all sorts of designs from Pillsbury and bake a variety of them. It will look like you did alot of work but you didn't. They will look pretty on a platter and impress your guests. They are very tasty as well so you can't lose.
Enjoy!
-Sophia/Two Frys
 |
| Pillsbury Ready To Bake Christmas Tree Shape Sugar Cookies |
 |
| Pillsbury Ready To Bake Christmas Tree Shape Sugar Cookies |
Enjoy!
-Sophia/Two Frys
Sunday, December 5, 2010
Apple Pie
Apple Pie
I followed the recipe exactly as listed on the Pillsbury site (see below for link) and it was very easy. There is also an accompanying video to make the process as smooth as possible. The longest prep time was actually peeling, coring, and slicing the apples. I recommend using firm Granny Smith apples and a glass pie plate.
Recipe:
Perfect Apple Pie
Enjoy!
-Sophia/Two Frys
I decided a few days ago I would make an apple pie, and the results were amazing. The taste exceeded my expectations. To keep things simple and as mess free as possible, I used Pillsbury Refrigerated Pie Crusts and I highly recommend it. Our apartment smelled so delicious for hours.
 |
| Apple Pie |
Recipe:
Perfect Apple Pie
Enjoy!
-Sophia/Two Frys
Sunday, November 28, 2010
Ghirardelli Double Chocolate Brownies
Ghirardelli Double Chocolate Brownies

I have to be honest and thought these brownies would be great but I had no idea they would surpass my expectations and be "Off The Hook" as Guy Fieri would say! I am a huge fan of Ghirardelli as it is and when I saw this at my local Stop & Shop I remembered it was on Oprah's favorite things list of this year so I decided to try it. I usually make brownies from scratch and have tried some other boxed brands like Duncan Hines and Betty Crocker and they are all really good, but this is the jewel of chocolate brownie mixes in a box.
 |
| Ghirardelli Double Chocolate Brownies out the oven! |
 |
| A nice piece of yummy brownie |
-Sophia/Two Frys
Saturday, November 27, 2010
Pumpkin Pie
Pumpkin Pie
I love to make Pumpkin Pie around this time of the year, and this Pillsbury recipe is super easy.
To use this recipe, go to:
http://www.pillsbury.com/recipes/easy-pumpkin-pie/5793eb83-dca1-45e0-96e1-7f73af9e282f/
One of my favorite things about this Pumpkin Pie is the smell all over the apartment. I just love it. It feels so warm and welcoming in the kitchen and smells delicious. I cannot wait until hubby and me eat it. Yum!
Enjoy!
-Sophia/Two Frys
I love to make Pumpkin Pie around this time of the year, and this Pillsbury recipe is super easy.
 |
| Pumpkin Pie ready to go in the oven! |
To use this recipe, go to:
http://www.pillsbury.com/recipes/easy-pumpkin-pie/5793eb83-dca1-45e0-96e1-7f73af9e282f/
One of my favorite things about this Pumpkin Pie is the smell all over the apartment. I just love it. It feels so warm and welcoming in the kitchen and smells delicious. I cannot wait until hubby and me eat it. Yum!
 |
| Pumpkin Pie fresh out the oven! |
-Sophia/Two Frys
Sunday, October 24, 2010
Halloween Cookies
Halloween Cookies
Today, I baked 2 dozen Halloween cookies. I used the Wilton 12 Cavity Nonstick Cookie Pan discussed in my former post. I bake a lot especially cakes, but have never used a pan with the different shapes in it so did not know how they would come out.
Things to know before you set out to do a project like this:
I am not an artist so using the decorating icing was harder than I thought. I can barely draw stick figures. Allen did great and decorated about half of the cookies. For beginners, I think we did a fine job! Some of the icing wouldn't stick on the cookie enough or too much came out so you can tell where that happened. I later learned this icing is better for cakes and is not good if you need to stack cookies. Next time, I will either buy Wilton's Royal Icing or make my own and dye it in different colors. Poor Frankenstein, I made a globby mess on him and my bat looks silly. It was quite an experience and fun either way.
Allen and I did not decorate some of the cookies, since this took way longer than I thought it would. I ate 3 of these cookies and love the taste. I used Betty Crocker Sugar Cookie Mix which only needs 1 egg and 1/3 cup of butter. Working with the dough was messy and took some getting used to. After this experience, I read somewhere that the dough should be refrigerated until it hardens up a little so it will be easier to work with.
I will be baking more cookies for Christmas and hope the decorating process gets easier as I go along. You will see whether I progress or not in the months and years to come. We will enjoy eating these cookies!
-Sophia & Allen/Two Frys
Today, I baked 2 dozen Halloween cookies. I used the Wilton 12 Cavity Nonstick Cookie Pan discussed in my former post. I bake a lot especially cakes, but have never used a pan with the different shapes in it so did not know how they would come out.
 |
| Halloween cookies Allen and I baked/decorated |
- Don't set your expectations high if you are a novice like me.
- Don't give up and try again if you fail.
- Keep cleaning as you go along because you will make a mess.
 |
| Halloween Cookies |
 |
| Halloween Cookies |
I will be baking more cookies for Christmas and hope the decorating process gets easier as I go along. You will see whether I progress or not in the months and years to come. We will enjoy eating these cookies!
-Sophia & Allen/Two Frys
Saturday, October 23, 2010
Wilton Goodies for Halloween Cookies
Wilton Goodies for Halloween Cookies
I want to make decorative cookies for Halloween and good thing I have a Target nearby because I found what I was looking for. I bought Wilton 12 Cavity Nonstick Cookie Pan. It features frankenstein, spider web, mummy, cat, bat, haunted house, candy corn, pumpkin, spider, R.I.P. tombstone, ghost, and cauldron. It will be fun trying to decorate these cookies and hubby is helping me. Pictures will be posted.
 |
| Wilton 12 Cavity Nonstick Cookie Pan |
 |
| Wilton 9-Piece Cake Decorating Set |
 |
| Wilton Decorating Icing, Spooky Sparkling Sugars |
 |
| Skull Placemats |
-Sophia/Two Frys
Monday, October 11, 2010
Skull Platters
Skull Platters
I got 4 Skull Platters for $1 each at my neighborhood discount store this morning in the Halloween section. I keep finding different stuff every week I go there. These Skull Platters go great with decorated Halloween cookies, cupcakes and candies. You can even serve hors d'oeuvres in these platters.
-Sophia/Two Frys
I got 4 Skull Platters for $1 each at my neighborhood discount store this morning in the Halloween section. I keep finding different stuff every week I go there. These Skull Platters go great with decorated Halloween cookies, cupcakes and candies. You can even serve hors d'oeuvres in these platters.
 |
| Skull Platters |
Monday, October 4, 2010
Skull Ice Trays and other Halloween Goodies
October is my favorite month for many reasons. The fall weather is great and I find the coolest stuff for Halloween. Today, I bought 4 Skull Ice Trays for $1 each. I love them! There are 10 skulls per tray and have many uses. They would complement any drink or can be used as desserts. For the ice trays, you could use them as chocolate molds or freeze your favorite smoothie, lemonade, sangria, etc. You could also freeze water with fresh mint or fruit slices such as strawberry, blueberry, raspberry, blackberry, lemon, or lime for seltzer or water. You will have delicious fresh flavor that is good for you.
Last week, I got this plastic Skull Goblet at my neighborhood Rite Aid for $2.49. It's fun for the holidays but since I love skulls I will use it all the time. The goblet is filled with Diet Cranberry Ginger Ale and looks real cool.
Have you found any cool Halloween goodies in your neighborhood? I would love for you to share in the comments section.
-Sophia/Two Frys
 |
| Skull Ice Trays |
 |
| Closeup of Skull Ice Trays |
 |
| Skull Goblet |
I bought this foam Silver Glitter Skull and Skull Tablecloth at the same discount store I found the Skull Ice Trays for $1 each.
 |
| Silver Glitter Skull |
-Sophia/Two Frys
Sunday, October 3, 2010
Peach Upside-Down Vanilla Pumpkin Spice Cake
Peach Upside-Down Vanilla Pumpkin Spice Cake
I was thinking of a way to use 3 peaches I had and decided to make this cake this afternoon. It is very rustic looking and tastes great. Enjoy a piece or two with your favorite cup of coffee, tea, or hot chocolate. This is my recipe. I hope you try it.
Cake Ingredients: 1/3 cup vegetable oil
2/3 cup sugar
2/3 cup milk
2 extra large eggs
2 teaspoons baking powder
1 2/3 cup all purpose flour (I like King Arthur 100% Organic All-Purpose Flour)
1/8 teaspoon kosher salt
1 tablespoon pumpkin spice
1/2 teaspoon almond extract
1 teaspoon vanilla extract
Peach Ingredients:
1/3 cup unsalted butter
3 peaches thinly sliced (remove core)
1 cup dark brown sugar
Preheat oven at 350 degrees F. Use a 9x13 inch baking pan and put butter in pan to melt in oven for a few minutes. Keep an eye on this since you do not want the butter to burn. Take out pan and sprinkle dark brown sugar over the melted butter. Then place the sliced peaches on top.
In a mixing bowl, beat vegetable oil and sugar until it is light and fluffy. Then add remaining ingredients starting with half the amount of flour, then all the wet ingredients, and finish with the remaining flour. Mix well until all the ingredients are blended. Pour batter over peaches.
Bake in oven at 350 degrees F for 40-45 minutes. (Check oven at 35 minute mark since ovens vary). Insert toothpick and if it comes out clean, it is ready.
Let the cake cool for about 10 minutes and then turn upside down on a large square serving plate or use a large wood cutting board. Let it cool for another 20 minutes before serving.
Add vanilla ice cream or whipped cream if you want. It's delicious.
Enjoy!
-Sophia/Two Frys
I was thinking of a way to use 3 peaches I had and decided to make this cake this afternoon. It is very rustic looking and tastes great. Enjoy a piece or two with your favorite cup of coffee, tea, or hot chocolate. This is my recipe. I hope you try it.
 |
| Peach Upside-Down Vanilla Pumpkin Spice Cake |
2/3 cup sugar
2/3 cup milk
2 extra large eggs
2 teaspoons baking powder
1 2/3 cup all purpose flour (I like King Arthur 100% Organic All-Purpose Flour)
1/8 teaspoon kosher salt
1 tablespoon pumpkin spice
1/2 teaspoon almond extract
1 teaspoon vanilla extract
Peach Ingredients:
1/3 cup unsalted butter
3 peaches thinly sliced (remove core)
1 cup dark brown sugar
Preheat oven at 350 degrees F. Use a 9x13 inch baking pan and put butter in pan to melt in oven for a few minutes. Keep an eye on this since you do not want the butter to burn. Take out pan and sprinkle dark brown sugar over the melted butter. Then place the sliced peaches on top.
In a mixing bowl, beat vegetable oil and sugar until it is light and fluffy. Then add remaining ingredients starting with half the amount of flour, then all the wet ingredients, and finish with the remaining flour. Mix well until all the ingredients are blended. Pour batter over peaches.
Bake in oven at 350 degrees F for 40-45 minutes. (Check oven at 35 minute mark since ovens vary). Insert toothpick and if it comes out clean, it is ready.
Let the cake cool for about 10 minutes and then turn upside down on a large square serving plate or use a large wood cutting board. Let it cool for another 20 minutes before serving.
Add vanilla ice cream or whipped cream if you want. It's delicious.
Enjoy!
-Sophia/Two Frys
Wednesday, September 29, 2010
Dip & Salsa Tasting With Trader Joe's
Dip & Salsa Tasting With Trader Joe's
 |
| Trader Joe's Organic Corn Chip Dippers |
 |
| Trader Joe's Raita An Indian Style Yogurt Dip |
 |
| Trader Joe's Pineapple Salsa |
 |
| Trader Joe's Mediterranean Creamy & Smooth Hummus |
Monday, September 27, 2010
Goodies for the Kitchen and Chives Lemon Aioli Recipe
Like many New Yorkers, we live in a small apartment but I tend to buy gadgets and things for the kitchen I have no space for. Anyways, the week of my gallbladder surgery my hubby got me this adorable Cheeseburger Timer to cheer me up. I love it and use it all the time!
Shopping at Target last week, I bought Nordic Ware International 101 Cookie Cutters (why not 100?). Since I am planning to do more baking and plan to participate in the Great American Bake Sale, I thought this would be fun to have and it costs less than ten bucks. I have used many of the shapes already. To make sure the dough does not stick to the cutter put it in flour first and then do your cutter shapes in the dough. The cutters work great. At target, I also purchased this nifty Chefmate Cake Carrier which is very handy when I bring my baked goodies to my family.
Another thing I did not have until yesterday was a Lemon Squeezer (thanks hubby). I used it last night when I made Chives Lemon Aioli for burgers and much more juice comes out than if you were to squeeze the lemon with your hand. You also don't have to worry about the pits falling in your recipe. I have a Lime Squeezer as well but if you can only get one now, buy the Lemon Squeezer since a lime will fit in it and is more versatile since it is larger. I saw an Orange Squeezer on the Food Network the other day and hope to get one soon.
Chives Lemon Aioli
2 tablespoons of Mayo
Squeeze juice of 1/2 lemon
Thinly chop 7-8 chives
1 teaspoon of coarse black pepper
For an extra kick, add 1 teaspoon of Sriracha HOT Chili Sauce
Mix together and chill for 2 hours
Serve on burgers, as sandwich spread or dip for veggies, very yummy!
-Sophia/One of Two Fry's
Great American Bake Sale:
http://gabs.strength.org/site/PageServer?pagename=GABS_homepage
 |
| Hamburger Timer |
 |
| Nordic Ware International 101 Cookie Cutters |
 |
| These are some of the cookie cutters |
 |
| Chefmate Cake Carrier |
 |
| Lemon Squeezer |
2 tablespoons of Mayo
Squeeze juice of 1/2 lemon
Thinly chop 7-8 chives
1 teaspoon of coarse black pepper
For an extra kick, add 1 teaspoon of Sriracha HOT Chili Sauce
Mix together and chill for 2 hours
Serve on burgers, as sandwich spread or dip for veggies, very yummy!
-Sophia/One of Two Fry's
Great American Bake Sale:
http://gabs.strength.org/site/PageServer?pagename=GABS_homepage
Saturday, September 25, 2010
Spinach Ricotta Ravioli and Cheesy Breadsticks
Spinach Ricotta Ravioli and Cheesy Breadsticks
In the spirit of Sandra Lee's technique of semi-homemade with store bought ingredients, I whipped up this delicious dinner tonight in about twenty minutes. Recipe below.
Trader Joe's Spinach Ricotta Ravioli with Fiore's Famous Garlic Sauce Bring large pot of water to a boil
When boiling add 1 teaspoon of olive oil
Add coarse kosher salt
Carefully drop in ravioli and cook for 4-5 minutes
Drain
Sauce
1/4 cup of Fiore's Famous Garlic Sauce
1/2 cup of Chicken Stock
1 teaspoon of Olive Oil
Simmer for ten minutes on low heat
Mix drained ravioli with sauce
Top with Grated Parmesan and a handful of roughtly chopped flat leaf parsely and serve immediately
Cheesy Breadsticks
Pillsbury Breadsticks Original
Follow package instructions
Bake for about ten minutes then take out real quick and generously sprinkle each breadstick with shredded cheddar cheese
Return to oven for another 2-3 minutes
Mind your oven as they are all different
Serve along the pasta
-Sophia/Two Frys
In the spirit of Sandra Lee's technique of semi-homemade with store bought ingredients, I whipped up this delicious dinner tonight in about twenty minutes. Recipe below.
 |
| Spinach Ricotta Ravioli and Cheesy Breadsticks |
When boiling add 1 teaspoon of olive oil
Add coarse kosher salt
Carefully drop in ravioli and cook for 4-5 minutes
Drain
Sauce
1/4 cup of Fiore's Famous Garlic Sauce
1/2 cup of Chicken Stock
1 teaspoon of Olive Oil
Simmer for ten minutes on low heat
Mix drained ravioli with sauce
Top with Grated Parmesan and a handful of roughtly chopped flat leaf parsely and serve immediately
Cheesy Breadsticks
Pillsbury Breadsticks Original
Follow package instructions
Bake for about ten minutes then take out real quick and generously sprinkle each breadstick with shredded cheddar cheese
Return to oven for another 2-3 minutes
Mind your oven as they are all different
Serve along the pasta
-Sophia/Two Frys
Friday, September 24, 2010
Trader Joe's Opens on the Upper West Side, NYC
Trader Joe's Opens on the Upper West Side, NYC
Allen and I were thrilled when we found out Trader Joe's was opening a store on the Upper West Side. Finally, this would be the closest location to us and it wouldn't take as long on the crowded subway to get home than Trader Joe's downtown Union Square location. Trader Joe's opened its doors on Monday and we went Friday evening. It was very crowded but we were able to move around just at a slower pace. We wanted to see everything first time around so we know where eveything is on subsequent visits. I was happy to see favorites like Goddess Dressing. The store has everything I have seen at other locations so I was very happy with the selections in all categories.
When you enter the store, you take an escalator or elevator down one level to shop and there is a second lower level for even more shopping. We were there around 5pm on a Friday evening so unless you live around the area and are just going in for a few things go earlier or later. In the future, we will try and avoid heavy crowds at this time. The lines were so long but employees helped to keep it organized and it went real fast. There are so many registers so don't let long lines deter you from shopping.
You can buy Trader Joe's cool selection of green reuseable bags from $1 and up or bring your own. You can ask for paper bags for no extra cost instead of using plastic bags. We brought two bags from our August vacation in California we purchased when we stayed with hubby's parents in Livermore. We filled up both these bags, bought another one and in total, came out of Trader Joe's with four bags of goodies. We are so happy Trader Joe's has opened in this location.
-Sophia and Allen/Two Frys
 |
| Trader Joe's 72nd Street and Broadway, Grand Opening |
When you enter the store, you take an escalator or elevator down one level to shop and there is a second lower level for even more shopping. We were there around 5pm on a Friday evening so unless you live around the area and are just going in for a few things go earlier or later. In the future, we will try and avoid heavy crowds at this time. The lines were so long but employees helped to keep it organized and it went real fast. There are so many registers so don't let long lines deter you from shopping.
 |
| Hubby with 3 of our bags from our Trader Joe's shopping |
-Sophia and Allen/Two Frys
Friday, September 10, 2010
Ina Garten's Beatty's Chocolate Cake & Coconut Cake
 |
| Barefoot Contessa At Home Cookbook |
Beatty's Chocolate Cake -
Ingredients
Butter, for greasing the pans
1 3/4 cups all-purpose flour, plus more for pans
2 cups sugar
3/4 cups good cocoa powder
2 teaspoons baking soda
1 teaspoon baking powder
1 teaspoon kosher salt
1 cup buttermilk, shaken
1/2 cup vegetable oil
2 extra-large eggs, at room temperature
1 teaspoon pure vanilla extract
1 cup freshly brewed hot coffee
 |
| Beatty's Chocolate Cake |
Preheat the oven to 350 degrees F. Butter 2 (8-inch) [I use 2 9-inch] round cake pans. Line with parchment paper, then butter and flour the pans.
Sift the flour, sugar, cocoa, baking soda, baking powder, and salt into the bowl of an electric mixer fitted with a paddle attachment and mix on low speed until combined. In another bowl, combine the buttermilk, oil, eggs, and vanilla. With the mixer on low speed, slowly add the wet ingredients to the dry. With mixer still on low, add the coffee and stir just to combine, scraping the bottom of the bowl with a rubber spatula. Pour the batter into the prepared pans and bake for 35 to 40 minutes, until a cake tester comes out clean. Cool in the pans for 30 minutes, then turn them out onto a cooling rack and cool completely.
Place 1 layer, flat side up, on a flat plate or cake pedestal. With a knife or offset spatula, spread the top with frosting. Place the second layer on top, rounded side up, and spread the frosting evenly on the top and sides of the cake.
 |
| I made it for my hubby's birthday, love the candle (hee hee) |
6 ounces good semisweet chocolate (recommended: Callebaut) [I use Ghirardelli]
1/2 pound (2 sticks) unsalted butter, at room temperature
1 extra-large egg yolk, at room temperature
1 teaspoon pure vanilla extract
1 1/4 cups sifted confectioners' sugar
1 tablespoon instant coffee powder
Chop the chocolate and place it in a heat-proof bowl set over a pan of simmering water. Stir until just melted and set aside until cooled to room temperature.
In the bowl of an electric mixer fitted with a paddle attachment, beat the butter on medium-high speed until light yellow and fluffy, about 3 minutes. Add the egg yolk and vanilla and continue beating for 3 minutes. Turn the mixer to low, gradually add the confectioners' sugar, then beat at medium speed, scraping down the bowl as necessary, until smooth and creamy. Dissolve the coffee powder in 2 teaspoons of the hottest tap water. On low speed, add the chocolate and coffee to the butter mixture and mix until blended. Don't whip! Spread immediately on the cooled cake.
Coconut Cake -
Ingredients
3/4 pound (3 sticks) unsalted butter, at room temperature, plus more for greasing the pans
2 cups sugar
5 extra-large eggs, at room temperature
1 1/2 teaspoons pure vanilla extract [I use 2 teaspoons]
1 1/2 teaspoons pure almond extract
3 cups all-purpose flour, plus more for dusting the pans
1 teaspoon baking powder
1/2 teaspoon baking soda
1/2 teaspoon kosher salt
1 cup milk
4 ounces sweetened shredded coconut
 |
| Coconut Cake |
1 pound cream cheese, at room temperature [I use 1 8 oz.]
1/2 pound (2 sticks) unsalted butter, at room temperature
3/4 teaspoon pure vanilla extract [I use 1 tablespoon]
1/4 teaspoon pure almond extract
1 pound confectioners' sugar, sifted
6 ounces sweetened shredded coconut
Directions
Preheat the oven to 350 degrees F. Grease 2 (9-inch) round cake pans, then line them parchment paper. Grease them again and dust lightly with flour.
In the bowl of an electric mixer fitted with a paddle attachment, cream the butter and sugar on medium-high speed for 3 to 5 minutes, until light yellow and fluffy. Crack the eggs into a small bowl. With the mixer on medium speed, add the eggs 1 at a time, scraping down the bowl once during mixing. Add the vanilla and almond extracts and mix well. The mixture might look curdled; don't be concerned.
 |
| Coconut Cake |
Pour the batter evenly into the 2 pans and smooth the top with a knife. Bake in the center of the oven for 45 to 55 minutes, until the tops are browned and a cake tester comes out clean. Cool on a baking rack for 30 minutes, then turn the cakes out onto a baking rack to finish cooling.
For the frosting, in the bowl of an electric mixer fitted with a paddle attachment, combine the cream cheese, butter, vanilla and almond extract on low speed. Add the confectioners' sugar and mix until just smooth (don't whip!).
To assemble, place 1 layer on a flat serving plate, top side down, and spread with frosting. [Instead of frosting I use pineapple preserves.] Place the second layer on top, top side up, and frost the top and sides. To decorate the cake, sprinkle the top with coconut and lightly press more coconut onto the sides. Serve at room temperature.
http://www.barefootcontessa.com/index.shtml
http://www.foodnetwork.com/ina-garten/index.html
Enjoy!
-Sophia/Two Frys
Subscribe to:
Posts (Atom)