Friday, November 24, 2017

Apple Crumb Cake

Apple Crumb Cake


Apple Crumb Cake

Apple Crumb Cake
Today is Black Friday and I woke up real early this morning not with shopping in mind but to bake this Apple Crumb Cake from Crunchy Creamy Sweet (link below).  I do not go out shopping on Black Friday since I hate crowds of people and shopping in general. I did do some online Christmas Shopping for Santa hubby while he was snoring away in the bedroom, hee hee... The smell of the Apple Crumb Cake while baking in the oven was like a dream. The smell of the apples baking with the cinnamon and the other ingredients is divine and fits perfectly with the season. This is a great breakfast cake accompanied best with tea or coffee. You do not need to use a mixer for this recipe just a bunch of bowls, some spatulas or wooden spoons and a whisk. It is very simple to put together. I recommend buying an apple corer if you do not have one as its speeds things up. You need an 8 or 9- inch springform pan. With this cake you get 3 layers with different textures in every bite: the tender and flavorful cake on the bottom, then the soft baked apples above it and lastly but certainly not least, the yummy and crunchy crumb topping. The crumb topping is so great and I will use it again with muffins. See recipe below.

Apple Crumb Cake
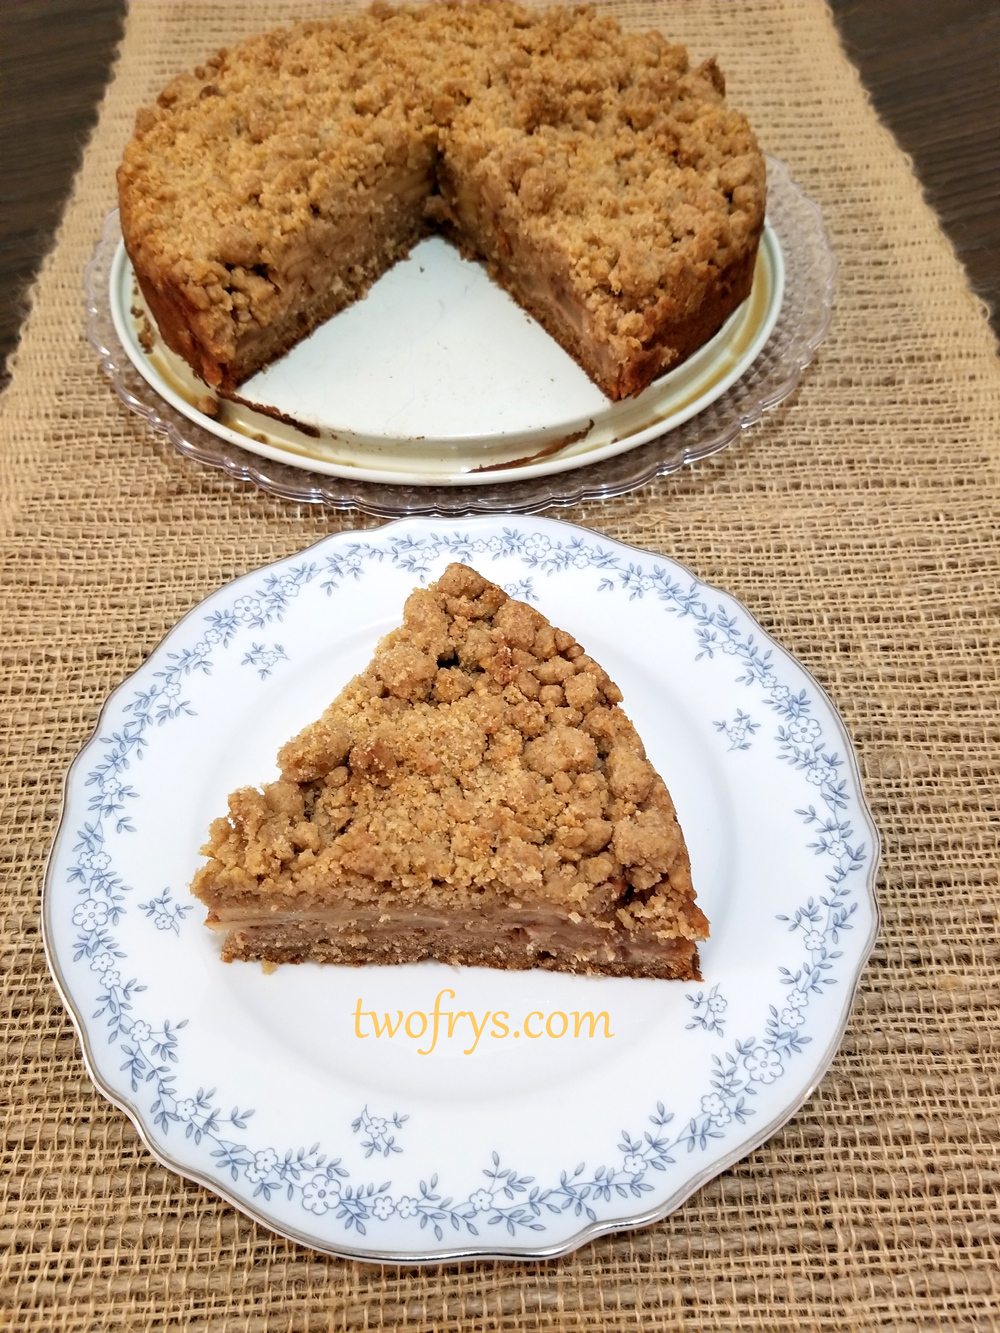
my piece, Apple Crumb Cake

Cake Ingredients:
3/4 cup King Arthur All-Purpose Flour

1/4 cup Granulated Sugar

1 teaspoon Baking Powder

1/8 teaspoon Baking Soda

1/8 teaspoon Coarse Salt

1 teaspoon Ground Cinnamon

1/4 cup + 2 tablespoons Milk

3/4 teaspoon Pure Vanilla Extract

1/4 cup + 2 teaspoons Vegetable or Canola Oil

1 Large Egg

Apple Crumb Cake

Apple Crumb Cake

Apple Mixture:
3 Apples (any kind you like, I used Red Delicious)

2 tablespoons Granulated Sugar

1/2 teaspoon Ground Cinnamon

1 tablespoon Apple Cider Vinegar

Crumb Topping:
1 1/2 cup King Arthur All Purpose Flour

1/3 cup Light Brown Sugar, packed

1/3 cup Granulated Sugar

1 teaspoon Ground Cinnamon

1/2 teaspoon Coarse Salt

1/2 cup (1 stick) Unsalted Butter

Apple Crumb Cake, 3 layers of yumminess

Cake batter

Directions:
Grease and flour springform pan. I use Wilton Bake Easy Non-Stick Spray.

Heat oven to 375 degrees.

Cake:
Using a large bowl, combine with spatula the flour, sugar, baking powder, baking soda, cinnamon, and salt; set aside.

In a medium sized bowl whisk together the milk, vanilla extract, oil, and egg.

Add the wet ingredients to dry ingredients and combine with a wooden spoon or a spatula.

Do not overmix.

Some lumps in the batter are fine.

Topping:
In a medium sized bowl, combine with wooden spoon or spatula flour, light brown sugar, granulated sugar, cinnamon, and salt.

Melt butter in microwave for about 45 seconds to 1 minute. Do in 15 second increments until melted and let cool completely.

Add cooled melted butter and combine.

Use fork to fluff up mixture until crumbs form, set aside.

Apple Mixture:
Peel, core and thinly slice 3 apples.

In a medium sized bowl, add apples.

Using a spatula or wooden spoon toss apples together with the 2 tablespoons of sugar, 1/2 teaspoon of cinnamon, and 1 tablespoon of Apple Cider Vinegar.

Apples tossed with sugar, cinnamon and apple cider vinegar

Crumb topping
Pour cake batter into prepared springform pan.

Arrange apple slices on top of the batter covering the batter completely.

Sprinkle the crumb topping over the apples making sure to cover them all around the sides and top of the pan.

Bake for 30-38 minutes or until topping is golden brown.

My cake baked in 38 minutes.

Oven temperatures vary so start checking the cake at the 30 minute mark and adjust extra time accordingly.

Let cake cool completely in pan, about 1 hour.

Gently release springform pan over serving plate or cake stand.

Serve.

Cover with foil and keep in fridge for up to 4 days.

For the Apple Crumb Cake recipe, visit Crunch Creamy Sweet:
http://www.crunchycreamysweet.com/2014/09/21/the-best-apple-crumb-cake/

Enjoy!

-Sophia/Two Frys

Thursday, November 23, 2017

Pumpkin Pie

Pumpkin Pie

Pumpkin Pie
Happy Thanksgiving everyone! I baked this pumpkin pie very early this morning since we have a 16 pound turkey going in the oven. This is the first year we are spending Thanksgiving in our place. Years back (prior to her declining health), my Mom was host and cooked the entire Thanksgiving meal and our entire family went to her place. My Mom was our guest and it was just the 3 of us with plenty of food to share. This pumpkin pie was our dessert and I served it with vanilla bean ice cream. The aromas while the pie baked was heavenly. This recipe is adapted from the famous Libby's Famous Pumpkin Pie (link below). For the pie crust, I use Ina Garten's pie crust recipe (see link below). I use the pumpkin shape from Paula Deen Pie Press Cutter Set, and the leaf cutout is from Wilton Pie Crust Cutter & Stamp Set. I hope you all had a wonderful day with family and/or friends. See recipe below.

Pumpkie Pie

Pumpkin Pie Ingredients:
1 can (12 oz) NESTLE CARNATION Evaporated Milk

1 can (15 oz) LIBBY's 100% Pure Pumpkin

2 Large Eggs

3/4 cup Light Brown Sugar, lightly packed

1/2 teaspoon Coarse Salt

2 tablespoons Pumpkin Pie Spice (You can make your own, see recipe here)

1 teaspoon Water

Pie Crust Homemade or Store Bought

Pumpkin Pie

Pumpkin Pie Directions:
Heat oven to 425 degrees.

In a medium sized bowl, combine with spatula light brown sugar, pumpkin pie spice, and salt, set aside.

In a large bowl, beat eggs with whisk.

Add pumpkin and sugar-spice mixture and combine with spatula.

Gradually add evaporated milk stirring with spatula just until combined.

Let pie crust come to room temperature for 15 minutes and place into glass or ceramic pie dish and press sides and bottom firmly.

Crimp crust or decorate as you wish.

Add in freezer for 15 minutes so pie crust holds its shape.

Remove from freezer and gently brush water around the crust, and top with remaining cinnamon-sugar.

Pour pumpkin mixture into pie shell.

After the first 15 minutes of baking, reduce oven temperature to 350 degrees, place pie shield (I use Mrs. Anderson's Pie Crust Shield) or cut strips of aluminum foil over crust.

Bake for another 40 to 55 minutes until cake tester or toothpick comes out clean. My pumpkin pie took 45 minutes to bake.

Cool pumpkin pie on a wire rack for 2 hours before serving.

After first 20 minutes of cooling, place decorative cutouts gently on top of pie.

If not serving right away, carefully cover with foil and refrigerate until you are ready to serve it.

Mom's slice with a scoop of vanilla bean ice cream

Crust Cutout Ingredients:
1 homemade or store bought pie crust at room temperature

1 tablespoon Granulated Sugar

1 tablespoon Ground Cinnamon

1 tablespoon Water

Cutout Directions:
Roll out 1 pie crust and make as many pumpkin and leaf cutouts as you wish.

Place cutouts on a cookie sheet.

Brush cutouts lightly with water.

Take sugar and cinnamon, and combine in small bowl.

Lightly sprinkle cinnamon-sugar on top. (Save the rest to sprinkle over the pie crust.)

Place crust cutouts in 425 degree oven for 7 to 9 minutes until crust is golden brown. Remove and place on wire rack to cool.

For the Ina Garten Pie Crust recipe, visit:
http://www.foodnetwork.com/recipes/ina-garten/perfect-pie-crust-recipe.html

For Libby's Famous Pumpkin Pie recipe, visit:
https://www.verybestbaking.com/recipes/18470/libbys-famous-pumpkin-pie/

Enjoy!

-Sophia/Two Frys

Sunday, November 19, 2017

Vanilla Sprinkle Cookies

Vanilla Sprinkle Cookies


Vanilla Sprinkle Cookies

Vanilla Sprinkle Cookies
This is the fifth and final recipe I baked for a Pre-Thanksgiving Potluck at work earlier this week. I had a total of 10 1/2 hours of sleep in 2 days to bake all the cookies. Hubby was happy since I filled the cookie jar for us both to share! This recipe does not require a mixer and is super easy to do. I changed the sugar from granulated to vanilla sugar to amp up the vanilla flavor profile. This cookie has a nice bite, and is at first chewy and then you get a little crunch from the jimmies sprinkles and nonpareils. I used fall/Halloween colors to coincide with the season, but use whatever color combinations you prefer. A colleague said these would be great ice cream sandwich cookies and I think so too. See recipe below.

Close-up of Vanilla Sprinkle Cookies
Yield: 3 Dozen Medium Size Cookies or 2 Dozen Large Cookies

Ingredients
3 cups King Arthur All-Purpose Flour

2 teaspoons Cornstarch

1 teaspoon Baking Powder

1 teaspoon Baking Soda

1 teaspoon Coarse Salt

1 2/3 cups Vanilla Sugar

1 cup (2 sticks) Unsalted Butter, melted and cooled

2 Large Eggs

2 teaspoons Vanilla Extract

3 tablespoons Jimmies Sprinkles

2 tablespoons Colored Nonpareils

Vanilla Sprinkle Cookies
Directions
Heat oven to 350 degrees.

Line baking sheets with parchment paper.

In a large bowl, whisk together the flour, cornstarch, baking powder, baking soda, and salt; set aside.

Melt butter in a small sauce pan over medium heat. Cool to room temperature and with a spatula stir in vanilla sugar.

In a large bowl, combine with a spatula the eggs and vanilla extract and then add to the butter/sugar mixture.

All the cookies I baked for a Pre-Thanksgiving Potluck at work!
Add flour mixture (dry ingredients) to wet ingredients and combine with a spatula.

Add sprinkles and nonpareils and stir together with a spatula.

Once dough has formed, cover with plastic wrap and freeze for 1/2 hour or chill in fridge for 1 hour.

My Two Frys label
Using a tablespoon or cookie scoop, form and place dough balls on baking sheets spacing 2 inches apart.

Bake for 11-13 minutes. Cookies will look slightly underdone, but will continue to cook on baking sheet.

Wait 3 minutes and transfer to wire racks to cool completely.

The Funfetti Cookies recipe is from Sugar Spun Run:
https://sugarspunrun.com/funfetti-cookies/

Enjoy!

-Sophia/Two Frys

Saturday, November 18, 2017

Dark Chocolate Walnut Cookies

Dark Chocolate Walnut Cookies


Dark Chocolate Walnut Cookies
This is the fourth of five cookie recipes I baked for a Pre-Thanksgiving Potluck at work earlier this week. This recipe does not require a mixer and is simple to do. I changed the recipe to a dark chocolate cookie since this is my favorite kind of chocolate. This cookie is chewy, crunchy from the toasted walnuts, not too sweet, and full of dark chocolate flavor. See recipe below.

Yummy Dark Chocolate Walnut Cookies

Yield: 2 Dozen Cookies

Ingredients
1 1/2 cups King Arthur All-Purpose Flour

1/2 cup Unsweetened Dark Cocoa Powder

1 teaspoon Baking Soda

1/2 teaspoon Coarse Salt

1 cup Light Brown Sugar, packed

3/4 cup Melted Unsalted Butter, cooled

2 Large Eggs

2 teaspoons Vanilla Extract

3/4 cup Toasted Walnuts, roughly chopped

Dark Chocolate Walnut Cookies
Directions
Heat oven to 350 degrees.

Line baking sheets with parchment paper.

Add walnuts to a baking sheet and toast for about 8 to 10 minutes. Keep an eye on them so they do not burn! Let them cool and then roughly chop; set aside.

Melt butter in a small sauce pan over medium heat. Cool to room temperature; set aside.

In a large bowl, whisk together the flour, baking soda, dark cocoa powder, and salt; set aside.

In a large bowl, combine with a spatula the light brown sugar, eggs, and vanilla extract.

Add flour mixture (dry ingredients) to wet ingredients and combine with spatula.


Add cooled melted butter and stir with spatula.

Fold in walnuts.

Once dough has formed, cover with plastic wrap and freeze for 1/2 hour or chill in fridge for 1 hour.

Using a tablespoon or cookie scoop, form and place dough balls on baking sheets spacing 2 inches apart.

Bake for 9-11 minutes.

Wait 3 minutes and transfer to wire racks to cool completely.

The Fudgy Chocolate Walnut Cookies recipe is from Sweet and Savory Pursuits:
http://www.sweetandsavourypursuits.com/fudgy-chocolate-walnut-cookies/

Enjoy!

-Sophia/Two Frys

Friday, November 17, 2017

Lemon Cookies

Lemon Cookies
Lemon Cookies
Here is the third of five cookies recipes I baked for a Pre-Thanksgiving Potluck at work earlier this week. The cookie is soft and chewy with a tender crumb, and has the perfect balance of lemon from the zest, extract, and juice. If you are a lemon lover like I am, you need to make these cookies. I looked around for a recipe I would like, but read so many mixed reviews I decided to come up with my own recipe. See recipe below.

Dreamy tasting Lemon Cookies
Yield: 2 1/2 Dozen Cookies

Ingredients
2 cups King Arthur All-Purpose Flour

1 teaspoon Baking Soda

1 teaspoon Baking Powder

1/2 teaspoon Coarse Salt

1 cup Granulated Sugar

12 tablespoons (1 1/2 sticks) Unsalted Butter, softened and cut into cubes

2 Large Eggs

2 tablespoons Lemon Zest (Zest of 4 lemons)

3 tablespoons Freshly Squeezed Lemon Juice (About 2 Lemons)

1 teaspoon Lemon Extract

Lemon Cookies
Directions
Heat oven to 350 degrees.

Line baking sheets with parchment paper.

In a large bowl, whisk together the flour, baking soda, baking powder, and salt; set aside.

Using a mixer with the paddle attachment on medium speed, cream sugar and butter until light and fluffy, 1-2 minutes.

Add lemon zest and mix for bout 30 seconds.

Add eggs one at a time and mix just until incorporated.

Add lemon juice and lemon extract and mix until combined.

Turn mixer to low speed, and gradually add flour mixture until incorporated.

Lemon Cookies are do divine!
Once dough has formed, cover with plastic wrap and freeze for 1/2 hour or chill in fridge for 1 hour.

Using a tablespoon or cookie scoop, form and place dough balls on baking sheets spacing 2 inches apart.

Bake for 10-12 minutes or until cookies are set and slightly browned around the edges.

Wait 3 minutes and transfer to wire racks to cool completely.

Enjoy!

-Sophia/Two Frys

Thursday, November 16, 2017

Gingerbread Cookies

Gingerbread Cookies

Gingerbread Cookies
This is the second recipe I baked for a Pre-Thanksgiving Potluck at work earlier this week. The recipe is a crinkle cookie but since I did not add powdered sugar (just not a fan of it), I just call them Ginger Cookies. I love the spice this cookie has from the ginger spice. The molasses and dark brown sugar are what gives the cookie a deep brown color, and it is moist, and chewy. It also has the right amount of cinnamon and is not overpowering. See recipe below.

Tasty Gingerbread Cookies
Yield: 2 Dozen Cookies

Ingredients
3 cups King Arthur All-Purpose Flour

3/4 teaspoon Baking Soda

1/2 teaspoon Coarse Salt

1 cup Dark Brown Sugar, packed

1 tablespoon Ground Cinnamon

1 tablespoon Ground Ginger

1/2 teaspoon Ground Cloves

12 tablespoons (1 1/2 sticks) Unsalted Butter, softened and cut into cubes

3/4 cup Molasses

2 tablespoons Milk

24 Pumpkin Shaped Sprinkles (optional, I use Wilton)

Gingerbread Cookies
Directions
Heat oven to 350 degrees.

Line baking sheets with parchment paper.

In a large bowl, whisk together the flour, baking soda, salt, cinnamon, ginger, and cloves; set aside.

Using a mixer with the paddle attachment on medium speed, cream sugar and butter until light and fluffy, 1-2 minutes.

Add molasses and milk, and mix until incorporated; about 30 seconds.

Turn mixer to low speed, and gradually add flour mixture until combined.

Once dough has formed, cover with plastic wrap and freeze for 1/2 hour or chill in fridge for 1 hour.

This dough is very sticky from the molasses so it requires chilling.

Using a tablespoon or cookie scoop, form and place dough balls on baking sheets spacing 2 inches apart.

Bake for 10-12 minutes or until cookies are set and slightly browned around the edges.

Wait 3 minutes and if desired press a pumpkin shaped sprinkle into the center of the cookie (do this while the cookie is warm if not it will not stick), and then transfer to wire racks to cool completely.

The Ginger Crinkle Cookies recipe is from, If You Give A Blonde A Kitchen:
https://www.ifyougiveablondeakitchen.com/2015/12/04/gingerbread-crinkle-cookies/

Enjoy!

-Sophia/Two Frys

Wednesday, November 15, 2017

Pumpkin Chocolate Chip Cookies

Pumpkin Chocolate Chip Cookies


Pumpkin Chocolate Chip Cookies
I made cookies as my contribution to a Pre-Thanksgiving Potluck at work earlier this week. This is the first of 5 recipes I baked for it and all the cookies were a success. The Pumpkin Chocolate Chip Cookies recipe is adapted from Food Network. I reduced the baking soda by 1 teaspoon, added more Pumpkin Spice, and used Dark Chocolate Chips instead of Semisweet ones. If you do not have Pumpkin Spice, check out my recipe here to make your own. The cookies are soft, moist with a cake-like texture, and chewy. They have the perfect balance of pumpkin spice and dark chocolate. See recipe below.

Close-up of Pumpkin Chocolate Chip Cookies
Yield: 3 Dozen Large Cookies or 6 Dozen Small Cookies

Ingredients
3 cups King Arthur All-Purpose Flour

1 teaspoon Baking Soda

1/2 teaspoon Coarse Salt

1 cup Granulated Sugar

1 cup Light Brown Sugar, lightly packed

2 tablespoons Pumpkin Spice

1 cup (2 sticks) Unsalted Butter, softened and cut into cubes

2 Large Eggs

1 teaspoon Pure Vanilla Extract

1 cup Libby's 100% Pure Pumpkin (or homemade)

1 package (12 oz.) Hershey's Kitchens Special Dark Chocolate Chips

Yummy Pumpkin Chocolate Chip Cookies
Directions
Heat oven to 350 degrees.

Line baking sheets with parchment paper.

In a large bowl, whisk together the flour, baking soda, salt, and pumpkin spice; set aside.

In a medium size bowl, whisk together granulated sugar and light brown sugar; set aside.

Using a mixer with the paddle attachment on medium speed, cream sugars and butter until light and fluffy, 1-2 minutes.

Add eggs one at a time, vanilla extract, and pumpkin puree, and mix on medium speed until incorporated.

Turn mixer to low speed, and gradually add flour mixture until combined.

With a spatula, fold in dark chocolate chips.


Pumpkin Chocolate Chip Cookies
Once dough has formed, cover with plastic wrap and freeze for 1/2 hour or chill in fridge for 1 hour.

Using a tablespoon or cookie scoop, form and place dough balls on baking sheets spacing 2 inches apart.

Bake for 13-15 minutes or until cookies are set and slightly browned around the edges.

Wait 3 minutes and transfer to wire racks to cool completely.

The Pumpkin Chocolate Chip Cookies recipe is adapted from Food Network:
http://www.foodnetwork.com/recipes/pumpkin-chocolate-chip-cookies-recipe-1946557

Enjoy!

-Sophia/Two Frys

Wednesday, November 1, 2017

Sugar Skull Cookies

Sugar Skull Cookies


Sugar Skull Cookies
Sugar Skulls are part of the Feliz Dia de los Muertos (Happy Day of the Dead) celebration in Mexico! It is a happy day to honor family and ancestors that have passed on. To honor members of my family long gone, I baked Sugar Skull Cookies using the vanilla sugar cookie recipe from my Halloween Cookies.

One of the Sugar Skull Cookies
I love the wafer paper designs used to make the sugar skull cookies. They are just like coloring in a book but with edible markers and edible paper. I colored the wafer sheet first and let them dry a few hours and then carefully cut them. The wafer paper breaks easily so be careful with this step.

To adhere the wafer paper on the skull cookies, I decorated first with royal icing and let them dry overnight. I then used a brush dipped in light corn syrup on the undecorated side of the wafer skulls, and gently pressed them onto each cookie. It is important to let them set overnight so they do not stick together and the wafer paper tears.

For History of Day of the Dead & the Sugar Skull Tradition, visit:
http://www.mexicansugarskull.com/support/dodhistory.html

Enjoy!

-Sophia/Two Frys