Guy's Big Bite: A McConaughey and Fieri Feast
This episode aired Saturday, December 18 but I just watched it this morning as I am slowly catching up on my DVR taped Food Network shows. I really enjoyed this one hour Guy's Big Bite: A McConaughey and Fieri Feast and the recipes Matthew and Guy made looked delicious. To start things off Matthew made This Rum Ting drink for Guy and him while they cooked up Matthew's Malibu Oysters, JKL Pesto Pork and Veggie Roast, Soy Glazed Green Beans, and Farro Salad with Citrus Vinagrette. To compliment their food, Matthew made another drink Just Keep Livin' Margarita. You can find all the recipes from this episode on the Food Network site: http://www.foodnetwork.com/.
In between Matthew and Guy's cooking feast they shared stories about Guy coming over to Matthew's place in Malibu and cooking for hours and jamming on drums. Matthew also shared a little bit about his family, and the nonprofit he started Keep On Livin' which offers after school programs that teach teens healthy living and exercise in their lives. Guy and Matthew shared real nice chemistry and seemed to enjoy cooking together and chatting it up for the camera to die hard Guy Fieri fans like me. I am also happy they changed the intro for Guy's Big Bite - it's rockin' just like Guy!
-Sophia/Two Frys

Friday, December 31, 2010
Tuesday, December 28, 2010
Barefoot Contessa's How Easy Is That? Cookbook Review
Barefoot Contessa's How Easy Is That? Cookbook Review
One of the Christmas presents my husband got me was Ina Garten’s new cookbook Barefoot Contessa How Easy Is That? Fabulous Recipes & Easy Tips. I started reading the cookbook last night, and finished it this morning and am so excited to try these recipes. Ina offers helpful tips and makes thoughtful recommendations on equipment and kitchen stuff one should have handy and gadgets she does not bother owning. Most of us do not have an enormous kitchen as Ina has to stock everything we would like, but everything she recommends is practical and can work even in small kitchens like mine. Some pots I have not purchased yet since they are so expensive, but Ina offers affordable alternatives. There are 68 easy tips and some I already do, but Ina has given me new ideas for my kitchen space. I also love the Contessa's simple pictures of beautiful place settings for her dining table.
The recipes are simple, sound delicious, and the pictures are beautiful. I have seen some of these recipes on the Food Network already and remember wishing there were such a thing as smellavision. The book has six main sections cocktails, starters, lunch, dinner, vegetables and desserts. If you love to entertain friends and family, this cookbook is a treasure trove. The recipes are also perfect for family dinners or just for two as in my case. I have made many Ina recipes and they always come out great so I am eager to make many of the ones in this cookbook.
The main theme of the cookbook is the word "easy." Ina is keeping it simple by using easy ingredients, providing easy shortcuts, easy techniques, easy menus and easy recipes. I cannot wait to make Foie Gras With Roasted Apples, Roasted Vegetable Frittata, Tarragon Potato Salad, Greek Lamb With Yogurt Mint Sauce, Spaghetti Aglio E Olio, Easy Parmesan "Risotto," Sausage Stuffed Mushrooms, Chocolate Pudding Cream Tart and Strawberry Rhubarb Crisp. I want to make so many other recipes as well but I will make these recipes first.
-Sophia/Two Frys
 |
| Ina Garten - How Easy Is That? |
The recipes are simple, sound delicious, and the pictures are beautiful. I have seen some of these recipes on the Food Network already and remember wishing there were such a thing as smellavision. The book has six main sections cocktails, starters, lunch, dinner, vegetables and desserts. If you love to entertain friends and family, this cookbook is a treasure trove. The recipes are also perfect for family dinners or just for two as in my case. I have made many Ina recipes and they always come out great so I am eager to make many of the ones in this cookbook.
The main theme of the cookbook is the word "easy." Ina is keeping it simple by using easy ingredients, providing easy shortcuts, easy techniques, easy menus and easy recipes. I cannot wait to make Foie Gras With Roasted Apples, Roasted Vegetable Frittata, Tarragon Potato Salad, Greek Lamb With Yogurt Mint Sauce, Spaghetti Aglio E Olio, Easy Parmesan "Risotto," Sausage Stuffed Mushrooms, Chocolate Pudding Cream Tart and Strawberry Rhubarb Crisp. I want to make so many other recipes as well but I will make these recipes first.
-Sophia/Two Frys
Monday, December 27, 2010
Darkened Red Velvet Snowball Cake
Darkened Red Velvet Snowball Cake
This is the first time I made a red velvet cake, but I did not want to follow a traditional recipe or use cream cheese frosting since I use this frosting on Ina Garten's Coconut Cake that I often make for my loved ones. On Christmas morning, I made this Darkened Red Velvet Snowball Cake for my hubby and me. I love the richness, better taste, and color of dark chocolate cake so I used dark instead of milk chocolate hence the darker red color. I used the cake recipe ingredients from Redbook Magazine www.redbookmag.com/recipefinder/red-velvet-snowball-cake-recipe but not the cream cheese frosting. For the frosting, I made a Fluffy White Frosting from http://www.cooks.com/ so you can go there and search for "fluffy white frosting" and pick the recipe you like best.
I used Mounds Sweetened Coconut Flakes for the top of the cake and loved the taste and freshness of the coconut flakes. The Redbook recipe divided each 9 inch cake layer in half so you have four layers, but I kept mine a two layer cake. When you frost the cake, be sure to let it set for at least three hours before you serve it. I think this is the moistest cake I have ever made with dark chocolate in the mixture. It is so delicious and beautiful as well.
Enjoy!
-Sophia/Two Frys
 |
| Darkened Red Velvet Snowball Cake |
 |
| Slice of Darkened Red Velvet Cake |
Enjoy!
-Sophia/Two Frys
Sunday, December 26, 2010
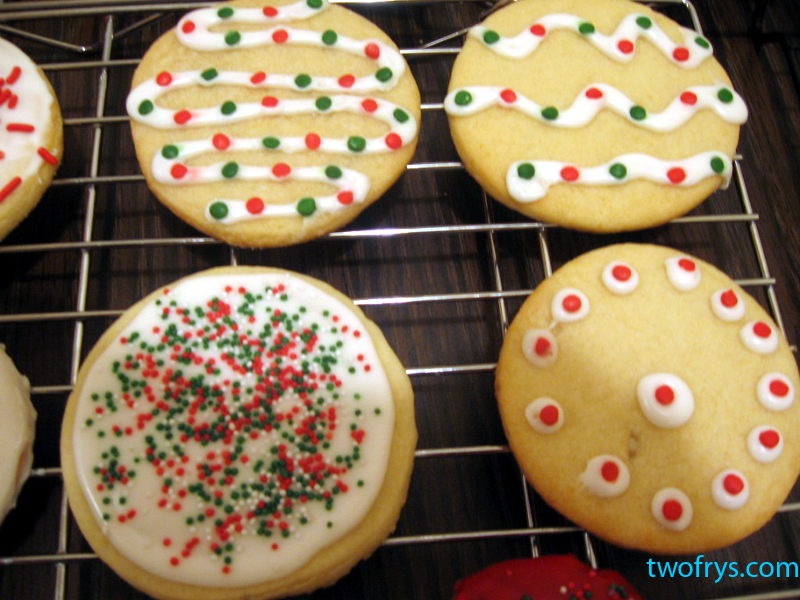
Holiday Cookie Baking
Holiday Cookie Baking
I did not finish final exams and papers until December 20th, so I only had a few days to do Christmas gift shopping and holiday baking. Needless to say, I am still tired and recovering but am thrilled it is my final semester of classes and next semester is all about the thesis and graduating. Phew... Baking cookies I find takes a lot of preparation, patience and space. My kitchen is very small so this was a major challenge. On December 23rd, I spent nine hours baking and decorating cookies. I found it relaxing and had fun!
 |
| Decorating Icing, I didn't use the color dyes but had them out just in case I needed them |
 |
| Betty Crocker Decorating Icing |
 |
| Some of my gingerbread cooling |
 |
| My funky snowmen! |
 |
| Assorted cookies drying |
 |
| Gingerbread boys and girls |
 |
| Gingerbread men |
 |
| Tree Ornaments |
 |
| Stars! |
 |
| Decorated icicles and stars |
 |
| Christmas Trees |
 |
| Hearts |
Enjoy!
-Sophia/Two Frys
Wednesday, December 8, 2010
Pillsbury Christmas Tree Shape Sugar Cookies
Pillsbury Christmas Tree Shape Sugar Cookies
I have to give all the credit to Pillsbury for their Ready To Bake Christmas Tree Shape Sugar Cookies. Hubby bought these to see if we would like them. They are delicious and there's hardly any work involved except for placing the dough onto two cookie sheets. Place the cookies about two inches apart and follow baking instructions. Keep an eye on the temperature for your oven and monitor them since they bake super fast between eight and ten minutes. Just cool the cookies for a few minutes and transfer them to a serving tray. If you want to place them in a cookie tin or your favorite cookie jar wait until they cool completely or they will break apart. I broke two and had to eat them immediately since I was being impatient. That's all there is to it.
If you are planning holiday festivities you can buy all sorts of designs from Pillsbury and bake a variety of them. It will look like you did alot of work but you didn't. They will look pretty on a platter and impress your guests. They are very tasty as well so you can't lose.
Enjoy!
-Sophia/Two Frys
 |
| Pillsbury Ready To Bake Christmas Tree Shape Sugar Cookies |
 |
| Pillsbury Ready To Bake Christmas Tree Shape Sugar Cookies |
Enjoy!
-Sophia/Two Frys
Sunday, December 5, 2010
Apple Pie
Apple Pie
I followed the recipe exactly as listed on the Pillsbury site (see below for link) and it was very easy. There is also an accompanying video to make the process as smooth as possible. The longest prep time was actually peeling, coring, and slicing the apples. I recommend using firm Granny Smith apples and a glass pie plate.
Recipe:
Perfect Apple Pie
Enjoy!
-Sophia/Two Frys
I decided a few days ago I would make an apple pie, and the results were amazing. The taste exceeded my expectations. To keep things simple and as mess free as possible, I used Pillsbury Refrigerated Pie Crusts and I highly recommend it. Our apartment smelled so delicious for hours.
 |
| Apple Pie |
Recipe:
Perfect Apple Pie
Enjoy!
-Sophia/Two Frys
Subscribe to:
Posts (Atom)