Sunday, July 26, 2020

Vanilla Cake

Vanilla Cake


Vanilla Cake is my birthday cake flavor this year! Yesterday, was my birthday and every birthday for the last several years I am either in Northern California visiting family or at Atlantic City, NJ having fun at a casino and enjoying the boardwalk and beach. With the current COVID-19 situation, I am playing it safe and staying home with my hubster and not travelling or going out much. So, I baked this cake and made spaghetti bolognese for dinner. Two of my favorite things: cake and pasta. In NYC, we are going through a heat wave and the air quality for most of the week was atrocious so staying in has been the norm these days. Thankfully, there is air conditioning inside and it helps with the unbearable temps and keeps me from passing out. It is not only the heat that keeps me indoors. I honestly do not feel comfortable dining outside as many people are doing in NYC or being amongst groups of people. When I go out to get groceries and such, there are so many people outside and not everyone wears a mask or maintains physical distancing protocols. I always do and the heat does not help since I have asthma, so I limit my time outside for now. 

Vanilla Cake

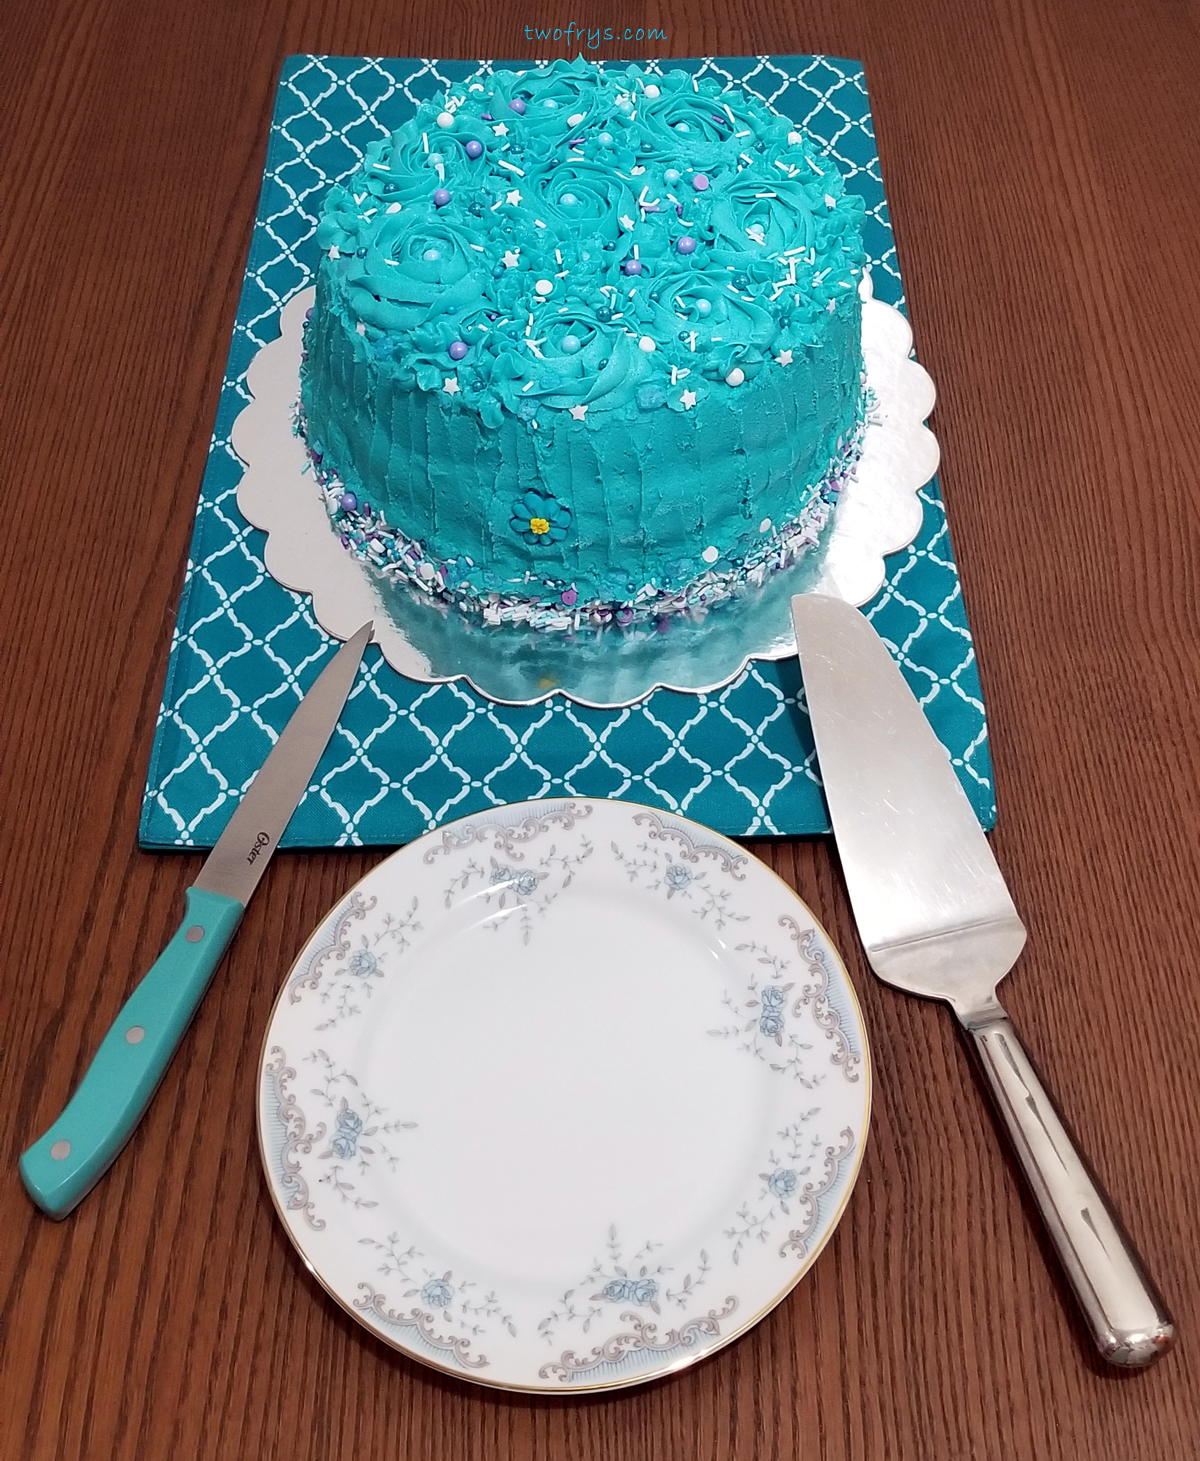
I digress. Back to this yummy vanilla cake and my temporary reprieve from thinking about the coronavirus. The recipe was adapted from My Cake School and the crumb has a velvety rich texture, and the sour cream perfectly balances the sweetness of the cake. I use vanilla sugar instead of granulated sugar to amp up the vanilla flavor, vanilla bean paste and vanilla extract. The vanilla aromatics while this cake baked was sublime. Since I made Allen a chocolate espresso cake for his birthday last month, I wanted a vanilla cake as it has been a long time since I baked one. The vanilla buttercream is so yummy and to tame the sweetness, I added a little salt. It was fun piping some rosettes and stars using Wilton drop flower decorating tip 2D, and I accentuated the cake with Sweetapolita Sprinkle Medley Skip To My Lou. I used Wilton Concentrated Gel Icing Color in Teal to achieve the vibrant color for the buttercream. 


Pretty blue candle

To grease cake pans:
2 teaspoons Unsalted Butter

2 teaspoons All-Purpose Flour

Cake Ingredients
3 cups Cake Flour

3 teaspoons Baking Powder

1/2 teaspoon Coarse Salt

2 cups Vanilla Sugar (or Granulated Sugar)

1 cup (2 sticks) Unsalted Butter, softened

3 Large Eggs, room temperature

1 cup Sour Cream

1/3 cup Milk

1 tablespoon Vanilla Bean Paste

2 teaspoons Pure Vanilla Extract


Let's cut this beauty!

Vanilla Buttercream Frosting
9 cups Confectioners'/Powdered Sugar

1 teaspoon Coarse Salt

1 cup (2 sticks) Unsalted Butter, softened

1/4 cup + 1 teaspoon Milk (Adjust to desired consistency)

3 teaspoons Pure Vanilla Extract

Directions
Heat oven to 350°F.

Line 2, 9" cake pans with parchment paper and use baking spray (such as Wilton) or butter and flour; set aside.

In a large bowl, whisk together the cake flour, baking powder, and salt; set aside.

In another bowl, whisk together the sour cream, milk, and vanilla extract.


My birthday cake!

Using a hand held or stand mixer fitted with a paddle attachment on medium speed, beat the butter until smooth; 1-2 minutes.

Gradually add the sugar and mix on medium speed until light and fluffy; 3-5 minutes.

Scrape the sides of the bowl with a spatula and mix again for 5-10 seconds.

Add eggs one at a time and incorporate.


My slice of heaven right here

Scrape the sides of the bowl and mix for 5-10 seconds.

Add the flour mixture and the sour cream mixture starting and ending with the flour mixture. (3 flour mixture additions; 2 sour cream mixture additions.)

Pour the batter into cake pans, 2/3 full.

Tap each pan on the counter to remove air bubbles from the cake batter. (OMG-I forgot to do this and I got some bubbles/air pockets so do not forget to do this. First time I did this-ugh.)

Bake for 25-30 minutes or until a toothpick inserted in the center comes out clean. My cake baked in 30 minutes.


Yummy!

Oven temperatures vary so check the cake at the 25 minute mark and adjust baking time accordingly.

Remove from oven and cool in pans for 30 minutes, and then invert onto a wire rack lined with parchment paper to cool completely. (The parchment will prevent the cake from sticking on the wire rack and making an imprint on the cake, which is so annoying when it happens.)

While the cake is cooling make the vanilla buttercream frosting.


Vanilla Cake

On medium speed using a hand held or stand mixer fitted with paddle attachment, beat the butter until smooth; 1-2 minutes.

Scrape the sides of the bowl and mix for 5-10 seconds.

Add the vanilla extract and incorporate; 1 minute.

Add half of the powdered sugar, salt, and 3/4 of the milk and beat on low speed until incorporated; 2 minutes.

Scrape the sides of the bowl and mix for 5-10 seconds.


My set up

Add the remaining powdered sugar and milk, and mix until incorporated; 2 minutes.

If your are tinting the icing, add and incorporate.

Scrape the sides of the bowl and mix for 20-25 seconds more.

If your layers have a dome on the tops, use a large serrated knife to remove before frosting the cake.

Place first cake layer top side down on cake stand or plate, and cover with the vanilla buttercream frosting.

Add the second cake layer top side up and frost the cake and decorate as desired.


Sprinkles and icing color I used

Place the cake in fridge to set.

Cover and remove 1/2 hour before serving.

Store cake up to 5 days covered in the fridge.

Vanilla Bean Cake recipe adapted from My Cake School:
https://www.mycakeschool.com/recipes/vanilla-bean-cake-recipe/

How to Pipe a Rosette:
https://www.wilton.com/how-to-pipe-a-rosette/WLTECH-48.html

For beautiful sprinkle collections visit Sweetapolita:
https://sweetapolitashop.com/

Enjoy!

-Sophia/Two Frys 

Saturday, July 4, 2020

Fourth of July Cookies

Fourth of July Cookies


Happy 4th of July! I hope you are enjoying time with family and practicing social distancing, and wearing your face covering to protect yourself and others from the COVID-19 pandemic. I am home with hubby relaxing, baking and decorating cookies. Allen made his awesome mild and spicy baked chicken wings and I made my yummy potato salad. Last week, I ordered some new cutters from Mike at Semi Sweet Designs (bald eagle, firework, USA, top hat mini cutters, half circle (for bunting cookie), 4th of July script, and truck with firework cutters, and combined them with different size star shapes I have. I use large and small shooting star, and two different flag cutters I purchased recently from Fancy Flours. I was excited to make these cookies and love the patriotic color combination of red, white, and blue. The dough is vanilla with red, white and blue jimmies sprinkles.


Fourth of July Cookies

Fourth of July Cookies

Yield: 3 Dozen Cookies (Depending on cutter size and thickness of cookie)

Ingredients
1 cup, 2 sticks Unsalted Butter, softened

1 1/2 cups Granulated Sugar

1 Large Egg

2 teaspoons Pure Vanilla Extract

2 3/4 cups All Purpose Flour

1 teaspoon Coarse Salt

1/2 cup Red, White, and Blue Jimmies


Fourth of July Cookies

Fourth of July Cookies

Directions
In a large bowl whisk together the flour and salt; set aside.

Cream butter and sugar in a hand held mixer or stand mixer with paddle attachment on medium speed; 1-2 minutes. Do not overmix.

Scrape sides of bowl with spatula and mix for a 10 seconds.


Fourth of July Cookies

Fourth of July Cookies

Add eggs, and vanilla extract and mix until incorporated. Do not overmix.

Turn off mixer and add the flour mixture and cover mixer with a kitchen towel, and then turn mixer on low speed and incorporate. 

Add sprinkles and mix just until incorporated; about 10 seconds.

The dough is ready when it begins to clump around the paddle attachment.


Fourth of July Cookies

Fourth of July Cookies

Form the dough into a disk shape and cover with plastic wrap, and chill in the fridge for 2-3 hours or overnight. I chilled the dough for 2 hours.

Heat oven to 400°F.

Use two sheets of parchment paper with the dough in between and roll with rolling pin until desired thickness is reached.

Cut out shapes.

Place onto cookies sheets lined with parchment paper, and put in freezer for 20 minutes. The cookies hold their shape when you do this.


Fourth of July Cookies

Fourth of July Cookies
Bake 7-10 minutes or until the edges have slightly browned. My cookies baked in 10 minutes. 

Oven temps vary so check the cookies at the 7 minute mark.

Make sure cookie sheets cool in between baking. I place them in the freezer for a few minutes.

Do not use hot cookie sheets or the cookies will spread and lose their shape.

Wait 5 minutes before transferring the cookies with cookie spatula to wire racks to complete cooling; about 1 hour.

Decorate once the cookies are cool to the touch.


Fourth of July Cookies

Fourth of July Cookies

Note about using sprinkles in cookie dough:
  • The cookies do not have a perfect shape so be mindful of this. 
  • Try not to roll out dough too much as the sprinkles will tint the dough.

Royal Icing
Ingredients
4 Egg Whites

4 teaspoons Lemon Juice, freshly squeezed

6 cups Powdered/Confectioners' Sugar, sifted

1 teaspoon Clear Vanilla Extract

1-3 teaspoons, room temperature water (if needed)


Fourth of July Cookies

Vanilla dough with red, white, and blue jimmies sprinkles

Directions
In a large bowl, sift the powdered sugar; set aside.

Separate the yolks and add the egg whites in a bowl.

In a bowl, whisk together the egg whites and lemon juice.

Transfer to a stand or hand held mixer with paddle attachment and mix on high for 1-2 minutes.

Add the vanilla extract and mix for 5-10 seconds.


Cookies just taken out of the oven

Cookies just taken out of the oven

With the mixer off add the sifted powdered sugar, cover the mixer with a kitchen towel, and then turn the mixer to low speed and beat until smooth. 

The consistency using this recipe is thick and great for borders and detail work.

If you need a both a border and flood-like consistency keep reading below.

If you only need flood consistency icing, add 1/2 teaspoon of water and mix for 5-10 seconds, and repeat until you reach the right consistency. Be careful that your icing does not become too runny or you may have to start over.


Red, white, and blue royal icing in Sweet Sugarbelle Icing Bottles

Various sprinkles and Rainbow Dust Metallic Food Paint
I found the best way to make royal icing is to separate the icing in plastic containers with lids according to the different colors I need. I save the containers when I order a pint of soup from Chinese takeout. These containers are great for icing. You can also use Tupperware or Pyrex.

Keep the containers or Tupperware/Pyrex covered until you are ready to color. 

I use AmeriColor Soft Gel Paste Food Color in Super Red and Royal Blue.

Use 1-2 drops at a time until you reach the desired color. Colors darken over time so be careful not to add too much color.

Once you have the colors completed in each container, take the amount you need of the border icing consistency and place into icing bottles, tipless bags, or pastry bags with desired tips.


My set up; important to cover kitchen table with plastic tablecloth for easy clean up

My set up 
Then with the remainder of the icing, use a spritz bottle with room temperature water to make flood consistency icing. Just spritz one or two times in the container and stir together with a small spatula or knife. A little water goes a long way. This works for me and I get the flood consistency I need. This part takes some practice. Then transfer the flood icing into icing bottles, tipless bags or pastry bags with desired tips.

I find doing it this way is easiest as you end up with the same color for both the border and flood consistency.

Decorate your cookies.

Do a border and then fill it immediately. If you are adding layers let the first layer dry completely. 

I use a cookie stick to reach edges, and to pop any air bubbles. 

Let the cookies dry overnight.


Stars all decorated

Please keep in mind if you are baking and it is humid, you may need more time for the cookies to dry. 

Since it is summer and my apartment kitchen is not air conditioned (poor me), I use a floor fan while I decorate. I left the fan circulating on low for several hours. This helps dry the icing.

Adapted from Sweet Sugarbelle, Rainbow Funfetti Cut-out Cookie Recipe:
http://www.sweetsugarbelle.com/2015/07/rainbow-funfetti-cutout-cookie-recipe/

Check out Semi Sweet Designs for great cookie cutters and tutorials:
https://shop.semisweetdesigns.com/

Check out Fancy Flours for all your baking supplies:
https://www.fancyflours.com/

Enjoy!

-Sophia/Two Frys