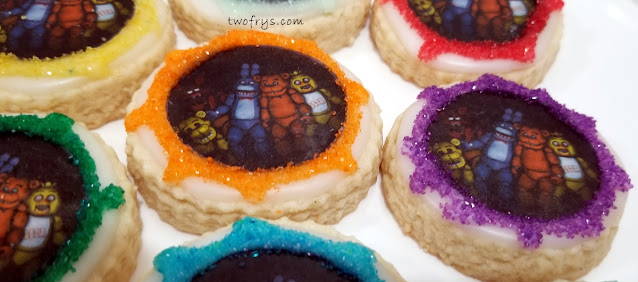
Five Nights at Freddy's (FNAF) Cookies
My nephew turned 7 recently and he is a huge fan of Five Nights at Freddy's (FNAF) Cookies so my sister in law used this theme for his birthday party. I made cookies, she made an awesome FNAF cake and cupcakes, and her best friend made lots of desserts. For the cookies, I use wafer paper, edible markers, and an assortment of sprinkles. The party was held at the Bronx Burger House and it was a very loud and fun day! This vanilla bean sugar cookie is superb. The cookie texture is chewy and has a prominent vanilla flavor from the vanilla sugar, vanilla extract, and vanilla bean paste. I use an egg and dairy free icing for this recipe.
Vanilla Bean Sugar Cookie Ingredients
5 cups King Arthur All Purpose Flour
1 1/2 cups Vanilla Sugar
1 teaspoon Coarse Salt
2 cups (4 sticks) Unsalted Butter, softened
1 tablespoon Coconut Milk (or any dairy free brand you prefer)
2 Large Eggs
2 teaspoons Clear Vanilla Extract
1 tablespoon Vanilla Bean Paste
Directions
Whisk together flour and salt; set aside.
Cream butter and vanilla sugar in a hand held mixer or stand mixer with paddle attachment on low; 1-2 minutes. Do not overmix.
Scrape sides of bowl with spatula and mix for 10 seconds.
Add eggs one at a time and mix until incorporated.
Scrape sides of bowl and mix for 5 seconds.
Add coconut milk, vanilla extract, and vanilla bean paste, and mix on low until incorporated; about 20-25 seconds.
Scrape sides of bowl and mix for 5 seconds.
Turn off mixer and add the flour mixture, and cover mixer with kitchen towel, and turn mixer on low speed and incorporate.
The dough is ready when it begins to clump around paddle attachment.
Form into a disk shape and cover with plastic wrap and chill in fridge for 1-3 hours or overnight. I chilled the dough for 2 hours.
Heat oven to 350°F.
Take round cutter and make shapes. Repeat until you use all the dough.
Place onto baking sheets lined with parchment paper, and put in freezer for 30 minutes. The cookies hold their shape when you do this.
Bake 12-15 minutes or until the edges have slightly browned.
Wait 5 minutes before transferring cookies on cooling racks to complete cooling.
Decorate once cookies have cooled completely.
Egg-Dairy Free Icing (Double recipe if you have more than 40 cookies)
6 cups Powdered/Confectioners' Sugar, sifted
1/2 cup Coconut Milk + 1 tablespoon extra (for flooding cookies)
1/4 cup Light Corn Syrup
2 teaspoons Clear Vanilla Extract
Directions
In a large bowl, sift powdered sugar; set aside.
Using stand or hand held mixer with paddle attachment on medium-high speed, combine sugar and 1/4 cup of coconut milk and mix for 1-2 minutes until smooth.
Add remaining 1/4 cup of milk one teaspoon at a time until you reach the consistency you need.
Add corn syrup, vanilla extract, and mix for 10 seconds.
I separate the icing in plastic containers with lids according to how many different colors needed for tinting. This time I only needed white so no tinting was needed.
Keep the containers covered until you are ready to color.
Transfer the icing immediately into squeeze bottles, pastry bags fitted with desired tips, or tipless bags.
Outline each cookie and then immediately flood it.
Let cookies dry for 6-8 hours or overnight.
Wafer Paper Ingredients
Iced cookies
Cut wafer paper designs
Craft scissors
Craft brush
1/4 cup Light Corn Syrup (to adhere wafer paper to icing)
Directions
Using a craft knife, carefully cut the designs carefully. Wafer paper is very thin and will tear easily.
Make sure the icing is completely dry.
Add light corn syrup to a small bowl.
Dip the brush into the syrup and gently cover the undecorated side of the wafer paper design, and gently adhere onto each cookie. Run your finger around the edge of the design and press gently. Repeat this step until you adhere all the wafer paper designs.
Let the cookies set overnight so they do not stick together and so the wafer paper does not tear.
I purchased the wafer paper from toppers.usa: https://www.ebay.com/usr/toppers.usa
For the icing recipe visit, The Slow Roasted Italian: http://www.theslowroasteditalian.com/2013/12/best-tasting-sugar-cookie-icing-recipe.html
Enjoy!
-Sophia/Two Frys


No comments:
Post a Comment
Note: Only a member of this blog may post a comment.