Monday, February 12, 2018

Red Velvet Cookies

Red Velvet Cookies

Red Velvet Cookies

Red Velvet Cookies
I made Red Velvet Heart Cookies last year and they were a huge hit. Instead of red food color I use Lorann Professional Kitchen Red Velvet Bakery Emulsion. The cookies are a dark red color. This recipe from The Sweet Adventures of Sugar Belle. The texture of the cookie is chewy almost cake like, and tastes like red velvet in cookie form. They are so yummy and deserve to be part of your cookie recipes, so give it try. See recipe below. For the Royal Icing recipe, go to my previous post, Chocolate Cookies.

Yield: 3 dozen 3 1/2 inch cookies


Heart with Arrow Cookies (Arrows-Wilton Icing Decorations)

Ingredients
1 cup, 2 sticks Unsalted Butter, softened

1 Large Egg

3 tablespoons Milk

2 teaspoons Pure Vanilla Extract

1 tablespoon Lorann Professional Kitchen Red Velvet Bakery Emulsion

½ teaspoon Apple Cider Vinegar

2 cups Powdered/Confectioners Sugar

½ cup Cocoa Powder

3 1/4 cups King Arthur All Purpose Flour

1/4 cup Saco Cultured Buttermilk Powder

2 teaspoons Baking Powder

½ teaspoon Coarse Salt

Red Velvet Heart Cookies

Directions
Sift flour, cocoa powder, buttermilk powder, baking powder, and salt in large bowl and combine with whisk or spatula; put aside.

Cream the butter and sugar together in a bowl of an electric mixer with paddle attachment on low to medium speed. Mix until incorporated, about 1-2 minutes.

Scrape sides of bowl with spatula and mix again for 5-10 seconds more.

Add egg. Scrape down bowl with spatula and mix again for another 10 seconds.

Red Velvet Cookies

Add vanilla extract, red velvet emulsion, and milk, and mix for 1 minute.

Slowly add flour mixture and mix on low speed for 1-2 minutes.

Add vinegar.

Continue to mix until dough clumps around paddle attachment.

Form dough into a ball, cover with plastic wrap, and cool in fridge for 1-2 hours or overnight.

Red Velvet Cookies

Heat oven to 350 degrees.

Take 1/4 of the dough, use rolling pin and roll out between 2 pieces of parchment paper to desired thickness and cut out shapes. I used various heart shape cutters.

Mix a little cocoa powder with flour to lightly coat the cutters if needed.

Repeat rolling the dough and cutting shapes until you have used it all.

Place cookie shapes on parchment lined baking sheet and space apart 2 inches.

Put cookies in the freezer for 15 minutes before baking. They hold their shape when you do this.

Red Velvet Cookies
Bake cookies for 9-11 minutes, or until center of cookie no longer looks wet. My cookies baked in 11 minutes.

Let cookies cool in baking sheet for 5 minutes and transfer to wire rack to cool completely, about 1 hour.

Let cookie sheets cool completely before you bake again. I put the cookie sheet in the freezer for 5 minutes. Repeat until you have baked all the cookies.

For the Red Velvet Roll-Outs recipe, please visit The Sweet Adventures of Sugar Belle: http://www.sweetsugarbelle.com/2012/02/red-velvet-roll-outs-recipe/

For the Royal Icing recipe and video tutorial, please visit:
http://www.joyofbaking.com/RoyalIcing.html

Enjoy!

-Sophia/Two Frys

Sunday, February 11, 2018

Chocolate Heart Cookies

Chocolate Heart Cookies


Conversation Hearts
I found this recipe via the Smitten Kitchen blog (link below) and made them for Valentine's Day. This cookie has a great texture that is chewy and not too sweet. Chocolate lovers will be delighted eating these cookies. See recipe below.

Yield: 4 to 4 1/2 Dozen Cookies (depending on cutter size)

Conversation Hearts

Ingredients
3 cups King Arthur All Purpose Flour

1/2 teaspoon Baking Powder

1 1/2 cups Granulated Sugar

1/2 teaspoon Coarse Salt

2/3 cup Unsweetened Cocoa Powder (I use Ghirardelli)

1 cup, 2 sticks Lightly Salted Butter (or 1 stick Unsalted and 1 stick Salted), softened

2 Large Eggs

1 teaspoon Pure Vanilla Extract

Chocolate Valentine's Cookies. These were all for my hubster!

Directions
Whisk together flour, baking powder and salt; set aside.

Cream butter and sugar in a hand held mixer or stand mixer with paddle attachment on low; 1-2 minutes. Do not overmix.

Scrape sides of bowl with spatula and mix for 10 seconds.

Add eggs one at a time and mix until incorporated. Scrape sides of bowl and mix for 5 seconds.

Add vanilla extract, and mix on low until incorporated, about 20-25 seconds.

Add cocoa powder and mix until incorporated.

Chocolate Cookies
With mixer on low speed, slowly add flour mixture and incorporate. The dough is ready when it begins to clump around paddle attachment.

Roll dough into 2 balls, cover with plastic wrap and chill in fridge for 1-2 hours or overnight.

Take half of the dough leaving unused dough covered with plastic wrap in fridge until ready to use.

Heat oven to 350°F.

Use two sheets of parchment paper with dough in between and roll with rolling pin until desired thickness is reached.

If needed, dip cutters in flour, shake off excess, and make shapes.

Place onto cookies sheets lined with parchment paper, and put in freezer for 15 minutes. The cookies hold their shape when you do this.

Bake 8-11 minutes or until the edges have slightly browned. My cookies baked in 10 minutes.

Wait 5 minutes before transferring cookies on cooling racks to complete cooling.

Decorate once cookies have cooled completely.

Chocolate Heart Cookies

Large Batch Royal Icing
Ingredients

8 Egg Whites

8 teaspoons Lemon Juice, freshly squeezed

12 cups Powdered/Confectioners' Sugar, sifted

1 teaspoon Clear Vanilla Extract

2-4 tablespoons Water, as needed

Chocolate Cookies

Directions
In a large bowl, sift powdered sugar, set aside.

In a bowl, add egg whites.

In a bowl, whisk together the egg whites and lemon juice.

Transfer to stand or hand held mixer with paddle attachment and mix on high for 1-2 minutes.

Add vanilla extract and mix for 5-10 seconds.

With mixer speed on low, slowly add sifted sugar and beat on low until smooth.

If needed, you may add 1 teaspoon of water at a time until you reach the right consistency. Watch the Joy of Baking (link at the end) video for both Flooding Consistency and Piping Consistency Royal Icing. If you prefer a recipe using Meringue Powder, it is also available at this link.

Heart Cookies
Separate the icing in plastic containers with lids according to how many different colors needed for tinting.

I used AmeriColor Soft Gel Paste Food Color in Super Red, Fuchsia, and Pink. Use 1-2 drops at a time until you have the color you need.

Keep the containers covered until you are ready to color.

Transfer the icing immediately into squeeze bottles.

I outlined the cookies, and waited 1/2 hour and then filled them.

Use a paintbrush or cookie stick to reach edges, and use tip of cookie stick or a toothpick to pop any air bubbles.

Add colored sugar, nonpareils, sprinkles, confetti, sugar pearls, dragees, etc... over wet icing.

Mini Chocolate Hearts
I used AmeriColor Gourmet Writer Food Decorating Pens (Certified U.S. food grade) for the Conversation Hearts.

Let cookies dry overnight. This is essential so the icing does not stick together when you stack them or place in cookie tins for gifts.

If you are baking and it is humid, you may need more time for the cookies to dry.

Please visit, Smitten Kitchen for the Brownie Roll Out Cookies Recipe:
https://smittenkitchen.com/2008/04/brownie-roll-out-cookies/

Please visit, Joy of Baking for the Royal Icing Recipe and Video Tutorial:
http://www.joyofbaking.com/RoyalIcing.html

Enjoy!

-Sophia/Two Frys

Sunday, February 4, 2018

Gluten Free Chocolate Football Cookies

Gluten Free Chocolate Football Cookies


Gluten Free Chocolate 
Happy Superbowl Sunday! I am looking forward to the game tonight. Yesterday, I made Gluten Free Chocolate Football Cookies with Egg-Free Icing (link below). I used King Arthur Gluten Free All-Purpose Flour and Ghirardelli Unsweetened Cocoa Powder. Use any brand you like, but I list the gluten free and cocoa powder brands I use. This was my first time using Xanthum Gum and the dough came together really great thanks to the awesome recipe from the blog, Gluten Free on a Shoestring with Nicole Hunn (link below). The cookies are chewy, not too sweet, have the perfect amount of chocolate, and taste great. You do not even need a mixer for this recipe. It is so easy! See below.

Yield: 1 1/2 dozen cookies


Gluten Free Chocolate Football Cookies

Ingredients
1 1/2 cups King Arthur Gluten Free All-Purpose Flour

1/2 teaspoon Xanthan Gum (Do not add if your GF blend includes it)

1/4 cup Cornstarch

1/2 cup Ghirardelli Unsweetened Cocoa Powder

3/4 teaspoon Baking Powder

1/8 teaspoon Baking Soda

1/4 teaspoon Coarse Salt

1/2 cup Granulated Sugar

1/2 cup, 1 stick Unsalted Butter, melted and cooled

1 Large Egg, room temperature and beaten

1/2 teaspoon Pure Vanilla Extract

1/4 - 1/2 teaspoon Lukewarm Water

Gluten Free Chocolate Football Cookies

Directions
Heat oven to 350°F.

Line baking sheets with parchment paper.

Beat egg, set aside.

Melt the butter in microwave (30 seconds to 1 minute, in 15 second increments until done) and set aside to cool.

In a large bowl, add gluten free flour, xanthan gum, cornstarch, cocoa powder, baking powder, baking soda, salt, and sugar, and whisk until incorporated.

King Arthur Gluten Free All-Purpose Flour
Create a well in the center, and add the butter, egg, vanilla, and 1/4 teaspoon lukewarm water, and with a spatula combine after each ingredient.

Add 1/4 teaspoon and knead together with your  hands.

If dough is not sticking together well, add another 1/4 teaspoon of water.

Place dough in between two sheets of parchment paper and roll with rolling pin until desired thickness is reached.

Ghirardelli Unsweetened Cocoa Powder

Use cutter/s and make shapes.

Repeat until you have  used all the dough.

Place 2 inches aparts on baking sheets and place in freezer for 15 minutes to set. Cookies hold their shape when you do this.

Bake for 11-12 minutes. My cookies baked in 12 minutes.

Wait 5 minutes before transferring to wire racks to cool completely.

Xanthum Gum

Egg-Free Icing
Ingredients

6 cups Powdered/Confectioners' Sugar, sifted

1/2 cup Whole Milk

1/4 cup Light Corn Syrup

2 teaspoons Clear Vanilla Extract

Flour mixture, created a well for the wet ingredients

Directions
In a large bowl, sift powdered sugar; set aside.

Using stand or hand held mixer with paddle attachment on medium-high speed, combine sugar and 1/4 cup of milk and mix for 1-2 minutes until smooth.

Add remaining 1/4 cup of milk one tablespoon at a time until you reach the consistency you need.

Add corn syrup, vanilla extract and mix for 10 seconds.

Note: The corn syrup gives the icing a lovely shine.


Dough


I only used white icing for this recipe and placed it in a plastic container with lid and then transferred to a squeeze bottle.

I outlined the sides of each football cookie first, sprinkled dessicated coconut (optional) over the wet icing, and then made the football stitch.

Use a paintbrush to remove excess coconut.

Let cookies dry for at least 6-8 hours, but if you have more time drying them overnight is best to prevent the icing from sticking together if you need to stack them.

For the Gluten Free Chocolate Cutout Sugar Cookie recipe, visit Gluten Free on a Shoestring with Nicole Hunn:
https://glutenfreeonashoestring.com/chocolate-cutout-sugar-cookies/

For the Egg-Free Icing recipe, visit The Slow Roasted Italian:
http://www.theslowroasteditalian.com/2013/12/best-tasting-sugar-cookie-icing-recipe.html

-Enjoy!

Sophia/Two Frys

Friday, February 2, 2018

Groundhog Cookies

Groundhog Cookies


Groundhogs Chuck and Phil

Groundhogs Chuck and Phil
Happy Groundhog Day! I made 2 groundhog cookies using the dough from my previous post, Winter Theme Coconut Cookies so click the link for the cookie and royal icing recipe. I live in NY so I am partial to Staten Island Chuck (Charles G. Hogg, full name), but there's also the more well known Pennsylvania's Punxsutawney Phil. Will Chuck and/or Phil see their shadow? I know many who dislike this cold weather are eager to find out if we will have an early spring or have to endure six more weeks of winter, which means more cold weather and possibly snow. If Phil and Chuck do not see their shadow we will have an early Spring. If they do see their shadow we have six more long weeks of winter ahead. Chuck and Phil often give us conflicting forecasts but it is a fun tradition either way.

Did borders first and waited a half hour and filled with flood icing

-Enjoy!

Sophia/Two Frys

Thursday, February 1, 2018

Football Cookies

Football Cookies


Football Cookies

Football Cookies
I can imagine how many bakers out there will be making football theme cookies this weekend. I hope football fans are ready and psyched to see Superbowl LII with the Philadelphia Eagles and New England Patriots on Sunday, February 4. Those lucky enough to see it at U.S. Bank Stadium in Minneapolis, MN must be so pumped. I split the dough from my previous post, Winter Theme Coconut Cookies and made a bunch of football cookies. Click the link for the cookie and royal icing recipe. I used royal icing in brown and white, and dessicated coconut for the sides of the football.  Let the brown icing dry completely for at least 6-8 hours before adding the white icing. If you use dessicated coconut, make sure you do it while the icing is wet. The cookies are very simple and fun to do. I got the football cutter from Wilton. If you do not have a football cutter, just print a football on paper and use a craft knife to cut the shapes on the dough. I bought the football confetti, paper plates and napkins at Party City, and the football bowl from Dollar Tree. Happy Football Baking and go Eagles!

Football Cookies

Football Cookies

-Enjoy!

Sophia/Two Frys

Wednesday, January 31, 2018

Winter Theme Coconut Cookies

Winter Theme Coconut Cookies

Winter Theme Cookies
Before January ends and my February baking projects commence, I wanted to do another arctic/winter theme cookies post as I have done in the last few years: Pistachio Arctic Cookies: Polar Bears and Penguins and Arctic Cookies: Polar Bears and Penguins.  I added some new penguin and polar bear designs, and made an igloo, unicorn and panda. I also made a huge snowman from a cutter I got at T.J. Maxx after Christmas that was 75% off. The unicorn may seem odd to some but this unicorn is from the arctic. I love winter and we got more snow yesterday (just over 1-inch) and these cuties deserved a post. I was inspired by many bloggers for some of the designs as I am not an artist and draw stick figures for people. This cookie is a coconut lovers dream. I used dessicated coconut but if you cannot find it, just pulse coconut flakes in your processor or blender until it reaches a fine texture. The original recipe uses toasted coconut and I have made it this way as well and they were a hit, so either option works great. I suggest buying unsweetened coconut flakes to control the sugar content of the cookie. The texture of this coconut cookie is chewy and full of coconut flavor in every bite. The dessicated coconut adds a lovely texture. See recipe below.

Winter Theme Cookies
Yield: 2 Dozen Cookies (depending on cutter size)

Ingredients
1 cups (2 sticks) Unsalted Butter, softened and each stick cut into 8 cubes

1 cup Granulated Sugar

1 Large Egg

1 teaspoon Coconut  Milk (Silk)

1½ teaspoons Coconut Extract

2 ½ cups King Arthur All Purpose Flour

1/8 teaspoon Coarse Salt

1 cup Dessicated Coconut

Polar Bears

Directions
Cut each stick of butter into 8 pieces.

In a large bowl whisk together the flour, salt, and dessicated coconut; set aside.

Cream the butter and sugar together in a bowl of an electric mixer with paddle attachment on medium speed. Mix until incorporated, about 1-2 minutes.

Igloo and Penguins
Scrape sides of bowl with spatula and mix again for 5-10 seconds more.

Add egg and combine.

Scrape down bowl with spatula and mix again for another 10 seconds.

Add coconut milk, coconut extract, and mix for 1 minute.

Penguins
Slowly add coconut flour mixture to bowl, and mix on low speed for 1-2 minutes. I carefully cover the mixer with a kitchen towel.

When dough clumps around paddle attachment, it is ready.

Form dough into a ball, and cover with plastic wrap, and cool in fridge for 1-2 hours or overnight.

Heat oven to 350 degrees.

Take 1/2 of the dough, use rolling pin and roll out between 2 sheets of parchment paper until desired thickness is reached.

Super Size Snowman
Press lightly floured cutters into the dough to make desired shapes and repeat until you use all the dough.

Place cookie shapes on parchment lined baking sheets and space 2 inches apart.

Place cookies in the freezer for 15 minutes before baking. They hold their shape when you do this.

Bake cookies for 9-13 minutes, or until center of cookie no longer looks wet. My cookies baked in 13 minutes.

Polar Bears
Let cookies cool in baking sheets for 5 minutes and transfer to wire rack to cool completely, about 1 hour.

Let cookie sheets cool completely before you bake again. I put the cookie sheets in the freezer for 5 minutes.

Repeat until you have baked all the cookies.

Polar Bears

Large Batch Royal Icing
Ingredients
8 Egg Whites

8 teaspoons Lemon Juice, freshly squeezed

12 cups Powdered/Confectioners' Sugar, sifted

1 tablespoon Coconut Extract

1-3 teaspoons Water (as needed depending on the consistency you need)

Polar Bear

Directions
In a large bowl, sift powdered sugar, set aside.

In a bowl, add egg whites.

In a bowl, whisk together the egg whites and lemon juice.

Transfer to stand or hand held mixer with paddle attachment and mix on high for 1-2 minutes.

Add coconut extract and mix for 5-10 seconds.

Panda Bear
With mixer speed on low, slowly add sifted sugar and beat on low until smooth. Cover the mixer with a kitchen towel.

If needed, you may add 1 teaspoon of water at a time until you reach the right consistency.

For both icing recipes, I separated the icing in plastic containers with lids according to the different colors needed for tinting.

I used AmeriColor Soft Gel Paste Food Color in various colors. Use 1-2 drops at a time until you have the color you need.

Winter Unicorn
Keep the containers covered until you are ready to color.

I transferred the icing immediately into squeeze bottles.

If the royal icing hardens due to exposure to air, use a spray bottle and spray a little bit of water and shake bottle well holding the tip with your finger.

Be careful doing this since you do not want the icing runny. Too much water will make the color bleed on the cookie.

Test the icing consistency on a paper towel before decorating the cookie.

I outlined the cookies first and then filled them.

Use a paintbrush or cookie stick to reach edges, and use tip of cookie stick or a toothpick to pop any air bubbles.

Igloo
Add sprinkles, confetti, sugar pearls, dragees, etc... over wet icing.

I used AmeriColor Gourmet Writer Food Decorating Pens (Certified U.S. food grade) to sketch on some of the designs.

Let cookies dry overnight. This is essential so the icing does not stick together when you stack them or place in cookie tins for gifts.

If you are baking and it is humid, you may need more time for the cookies to dry.

For the Coconut Cookies using Toasted Coconut, please visit my Coconut Heart Cookies:
https://twofrys.blogspot.com/2016/02/coconut-heart-cookies.html

I was inspired to make Penguins from the Glorious Treats, Pink and Purple Penguin Cookies:
http://www.glorioustreats.com/2011/12/pink-and-purple-penguin-cookies.html

I used Sweetambs, Valentine's Day Panda Bear tutorial to make the Panda:
http://www.sweetambs.com/tutorial/valentines-day-panda-bear-cookies/


-Enjoy!

Sophia/Two Frys

Sunday, January 14, 2018

Winter Wonderland Cake

Winter Wonderland Cake


Winter Wonderland Cake
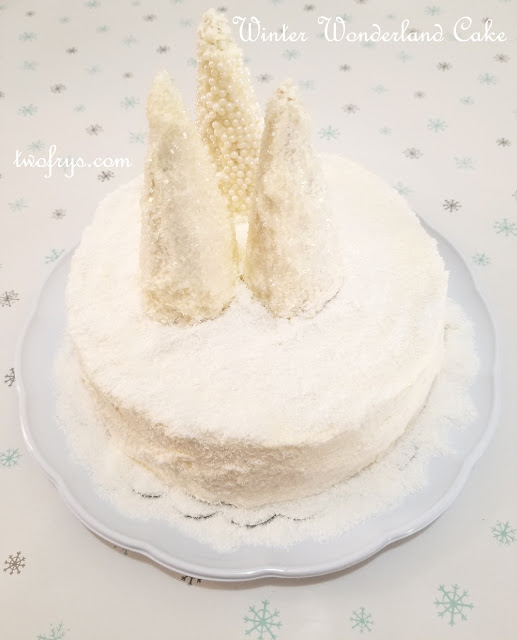
I took Cook's Illustrated White Layer Cake recipe (link below) and turned it into a Coconut Layer Cake by replacing the Whole Milk to canned Coconut Milk, and used Coconut Extract in place of Almond Extract. The Coconut Frosting is adapted from, The Complete America's Test Kitchen TV Show Cookbook 2001-2010 (pgs. 498-99). This cake is light and moist and has a tender crumb. The coconut taste is divine and the dessicated coconut all over the cake makes it a coconut lovers dream cake. To give the cake a Winter Wonderland look, I made White Trees using ice cream cones and covered them with frosting, and then rolled them in Wilton White Sparkling Sugar Sprinkles and Wilton White Sugar Pearls Sprinkles. I read about this DIY on The Cake Blog (link below) and wanted to try it. If you love coconut as much as I do, you gotta make this recipe! See recipe and directions below.

First slice goes to the baker, me! ;)

Cake
Ingredients
2 1/4 cups King Arthur Cake Flour, plus more for the cake pans

1 cup Coconut Milk, canned, room temperature

6 Large Egg Whites, room temperature

2 teaspoons Coconut Extract

1 teaspoon Vanilla Extract

1 3/4 cups Granulated Sugar

4 teaspoons Baking Powder

1 teaspoon Coarse Salt

1 1/2 sticks (12 tablespoons) Unsalted Butter, softened and cut into 12 pieces

Winter Wonderland Cake

Winter Wonderland Cake

Directions
Adjust oven rack to the middle position and heat oven to 350 degrees.

Grease 2 9-inch round cake pans, line with parchment paper and grease and sprinkle with cake flour.

Tap on counter and remove excess cake flour.

Whisk coconut milk, egg whites, coconut and vanilla extracts together in a medium sized bowl.

In a mixer with paddle attachment, mix cake flour, sugar, baking powder, and salt on low speed until combined, about 1 minute.

Increase speed to medium, beat butter into the flour mixture, a couple of pieces at a time, about 1 minute.

Continue to beat the mixture until it resembles moist crumbs, about 1 minute.

Beat in all but 1/2 cup of the coconut milk mixture, then increase speed to medium and beat until smooth, light and fluffy, about 1-2 minutes.

Reduce mixer speed to low and slowly add remaining coconut milk mixture until batter is combined, about 1 minute.

Close-up of my slice

Winter Wonderland Cake beauty!
Add batter into the prepared pans, smooth tops with spatula, and lightly tap the pans against the countertop two to four times to settle the batter.

Bake until a toothpick inserted in the center comes out clean, 23 to 25 minutes. My cake was done in 25 minutes.

Ovens vary so check the cake at 23 minutes or earlier and adjust baking time accordingly.

Cool cakes in pans for 10 minutes. Run a small knife around the edge of the cakes, then flip them carefully onto a wire rack.

Peel off the parchment paper, flip the cakes right side up, and cool completely.

Cover with plastic wrap and chill in fridge overnight or wait at least 2 hours if frosting the same day.

If you chill the cake overnight as I did, it will be easier to frost and not be as crumbly and the flavors develop more as well.

Pretty White Trees made from ice cream cones

Cake is frosted and ready to cover with the dessicated coconut

Coconut Frosting
Ingredients
2 tablespoons Heavy Cream

1 teaspoon Coconut Extract

1 teaspoon Vanilla Extract

1/2 teaspoon Coarse Salt

2 sticks (16 tablespoons) Unsalted Butter, softened and cut into pieces

1/4 cup Coconut Milk, canned

3 cups Confectioners/Powdered Sugar

Shredded or Dessicated Coconut (however much you wish over frosting and in between the cake layers). I used dessicated coconut.

I used King Arthur brand Cake Flour

Iberia Coconut Milk

Directions
In a small bowl, stir the cream, coconut and vanilla extracts, and salt together.

In a mixer with paddle attachment, beat butter and coconut milk on medium-high speed until smooth, about 30-45 seconds.

Reduce mixer speed to medium-low and gradually beat in confectioners/powdered sugar, then continue to beat until smooth, about 3 minutes.

Beat in the cream mixture. Increase mixer speed to medium-high and beat until light and fluffy, about 4-5 minutes.

Winter Trees
Ingredients

3 Ice Cream Cones

Coconut Frosting

Wilton White Sparkling Sugar Sprinkles and Wilton White Sugar Pearls Sprinkles.

Ice Cream Cones will become White Winter Trees

Directions
Hold 1 cone inside your index finger and with a small spatula frost cone rotating it with your finger.

Roll each frosted cone in a large bowl with sprinkles. Cover completely.

Carefully place on a cutting board, baking sheet, or flat surface to set until you frost cake.

Dessicated Coconut I purchased for this recipe

Frost Cake
Directions
Line edges of cake platter or cake turntable with strips of parchment paper to keep platter edges clean as you frost cake.

I use a cake turntable.

If you wish, you may slice off the tops of the cake layers with a serrated knife before frosting.

I never do since my cakes bake pretty evenly on top.

Pic of dessicated coconut
Place one of the cake layers on the platter/cake turntable top side down. Spread desired frosting over the cake, right to the edges.

Place other cake layer top side down and press lightly to adhere.

Frost the cake with remaining frosting. Cover the entire cake with coconut flakes/dessicated coconut (I used dessicated coconut).

Top the cake carefully placing each winter white tree and then add extra coconut flakes/dessicated coconut around the trees to make it look snowy.

If desired add more coconut on your cake platter all along the bottom of the cake.

For the Cook's Illustrated White Layer Cake recipe, visit Epicurious:
https://www.epicurious.com/recipes/member/views/cooks-illustrated-white-layer-cake-50017374

For the DIY Sparkling Christmas Trees Tutorial, visit The Cake Blog:
http://thecakeblog.com/2011/12/diy-sparkling-christmas-trees.html

Enjoy!

-Sophia/Two Frys