Pages

Friday, December 25, 2020

Eggnog Christmas Cookies

Eggnog Christmas Cookies

Merry Christmas everyone! 2020 was a year like no other and I am glad it is almost over. We stayed home due to COVID-19 and did not travel to Northern California as we did last year. I hope 2021 is a better year and this virus goes away. I really want to travel again and am so tired of wearing a mask everywhere and my glasses getting all fogged up. I just want some normalcy back. Enough of COVID talk. I love eggnog and made eggnog as my flavor for Christmas cut out cookies this year, and they taste great. The cookies are chewy and have a balanced and delightful flavor from the vanilla sugar, ground nutmeg, ground cinnamon, and eggnog.

Yield: 3 Dozen Cookies (Depending on cutter size and thickness of cookie)

Eggnog Christmas Cookies

Eggnog Christmas Cookies

Ingredients
6 cups All Purpose Flour

2 cups Vanilla Sugar

1 tablespoon Ground Nutmeg

1 teaspoon Ground Cinnamon

1/2 teaspoon Coarse Salt

2 cups (4 sticks) Unsalted Butter, softened

2 Large Eggs

1/3 cup Eggnog

2 teaspoons Clear Vanilla Extract
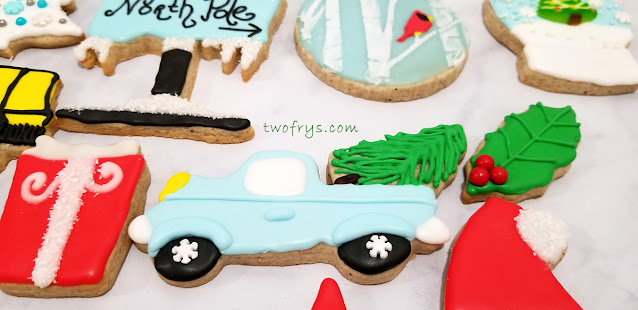
Close-up on some of the cookies

Directions
In a large bowl, whisk together flour, ground nutmeg, ground cinnamon, and salt; set aside.

Cream butter and sugar in a hand held mixer or stand mixer with paddle attachment on low; 1-2 minutes. Do not overmix.

Scrape sides of bowl with spatula and mix for 10 seconds.

Add eggs, eggnog, and vanilla extract, and mix until incorporated; about 1 minute. 

Close-up

Close-up

Scrape sides of bowl and mix for 5 seconds.

Turn off mixer and add the flour mixture, and cover mixer with kitchen towel. 

Turn the mixer to low speed and incorporate.
 
The dough is ready when it begins to clump around the paddle attachment.

Close-up

Close-up

Form into a disk shape, cover with plastic wrap, and chill in fridge for 1-3 hours or overnight.

Heat oven to 375°F.

Use two sheets of parchment paper with dough in between and roll with rolling pin until desired thickness is reached.

Cut out shapes.

Place onto cookies sheets lined with parchment paper, and put in freezer for 20 minutes. The cookies hold their shape when you do this.
Close-up

Close-up

Bake 8-12 minutes or until the edges have slightly browned. 

Oven temps vary so check the cookies at the 8 minute mark.

Make sure cookie sheets cool in between baking. I place them in the freezer for a few minutes, and repeat until you use up all the dough.

Do not use hot cookie sheets or the cookies will spread and lose their shape.

Wait 5 minutes before transferring cookies with cookie spatula to wire racks to complete cooling; about 1 hour.

Decorate once the cookies are cool to the touch.

Fireplace

Royal Icing (with Meringue Powder)
Yield: 8 cups

Ingredients
2 pounds Powdered Sugar 

1/3 cup Meringue Powder (I use Genie's Dream Meringue Powder Premium Blend)

1/2 cup Room Temperature Water (plus extra if you need to thin the icing)

2 teaspoons Clear Vanilla Extract

1 tablespoon Light Corn Syrup

Eggnog Christmas Cookies

Directions
In a large bowl, sift the powdered sugar; set aside.

Add meringue powder, room temperature water, and vanilla extract in mixer with whisk attachment and mix on high for 1 minute. Do not overmix.

Turn off mixer and switch to paddle attachment. 

Birch trees and a cute cardinal

Snowman with scarf

Add the powdered sugar, cover the mixer with a kitchen towel, and turn the mixer to low speed and slowly add light corn syrup and then beat on high speed until smooth; about 1-2 minutes.

The consistency using this recipe is thick and great for borders, stenciling, writing on cookies, and detail work.

If you need a both a border and flood-like consistency keep reading below.

Melted Snowman

Birch trees and a cardinal

Hat with matching mittens

If you only need flood consistency icing, add small amounts of room temperature water and mix for 5-10 seconds, and repeat until you reach the right consistency. Be careful that your icing does not become too runny or you may have to start over.

Keep the containers or Tupperware/Pyrex covered until you are ready to color. Royal Icing hardens fast.

I use Soft Gel Paste Food Color in various colors.

Use 1-2 drops at a time until you reach the desired color.


Eggnog Dough

Just a small amount of the cookies 

Once you have the colors completed in each container, take the amount you need of the border icing consistency and place into icing bottles, tipless bags, or pastry bags fitted with tips.

Then with the remainder of the icing, add small amounts of room temperature water to make flood consistency icing. Stir together with a small spatula and repeat until you have the consistency you need. 

A little water goes a long way. This works for me and I get the flood consistency I need. This part takes some practice. Then transfer the flood icing into icing bottles, tipless bags, or bags fitted with tips.

I find doing it this way is easiest as you end up with the same color for both the border/detail work and flood consistency.

Royal Icing

Icing is set!

Decorate your cookies.

Do a border and then fill it immediately. If you are adding layers let the first layer dry completely. 

Use a cookie stick to reach edges, and the tip to pop any air bubbles. 

Let the cookies dry overnight.

Keep in mind if you are baking and it is humid, you may need more time for the cookies to dry.

Eggnog Cut-Out Cookie recipe adapted from Sweetopia: 

https://sweetopia.net/2019/11/eggnog-cut-out-cookie-recipe/

Enjoy!

-Sophia/Two Frys

Thursday, December 24, 2020

Mini Christmas Cookies

Mini Christmas Cookies

I made Mini Christmas Cookies for my nephew Matthew with an Dairy-Egg Free Icing. I love this icing as it has a lovely shine, tastes great, and have used it for many years. I highly recommend it if you cannot use egg whites.

Mini Christmas Cookies

Dairy-Egg Free Icing (Double recipe if you have more than 40 cookies)

6 cups Powdered/Confectioners' Sugar, sifted

1/2 cup Coconut Milk  (or Almond Milk) + 1 tablespoon extra (if you need to flood cookies)

1/4 cup Light Corn Syrup

2 teaspoons Clear Vanilla Extract

Mini Christmas Cookies

Close-up

Directions

In a large bowl, sift the powdered sugar; set aside.

Using stand or hand held mixer with paddle attachment on medium-high speed, combine sugar and 1/4 cup of milk and mix for 1-2 minutes until smooth.

Add remaining 1/4 cup of milk and combine.  

Close-up

Mini Christmas Cookies

Add corn syrup, and vanilla extract, and mix for 20 seconds.

If the icing is too stiff, add 1 tablespoon (or less) of milk and combine.

For both icing recipes, I separated the icing in plastic containers with lids according to how many different colors needed for tinting.

Keep the containers covered until you are ready to color.

Mini Christmas Cookies

Icing

I transferred the icing immediately into squeeze bottles and tipless bags.

I outlined each cookie and then immediately flooded it.

Decorate as desired.

For the Egg Free Icing Recipe visit, The Slow Roasted Italian:

http://www.theslowroasteditalian.com/2013/12/best-tasting-sugar-cookie-icing-recipe.html

Enjoy!

-Sophia/Two Frys 

Wednesday, December 23, 2020

Gingerbread Cookies

Gingerbread Cookies

For the past several years, this is my go to recipe for Gingerbread Cookies. This cookie is chewy and has a perfect balance of flavor with the combined spices, molasses and orange zest. This is no ordinary gingerbread recipe. The orange zest really brings out the aromatics of this cookie and it tastes divine.

Yield: About 3 - 3 1/2-inch cookies depending on cutter size 

Gingerbread Cookies

Ingredients

3 1/2 cups All-Purpose Flour

1 teaspoon Baking Soda

1/4 teaspoon Coarse Salt

2 1/2 teaspoons Ground Ginger

1 teaspoon Ground Cinnamon

1/2 teaspoon Freshly Grated Nutmeg

1/4 teaspoon Ground Cloves

3/4 cup Light Brown Sugar, packed

1/2 cup (1 stick) Unsalted Butter, softened

3/4 cup Molasses

1 Large Egg

1 tablespoon Grated Orange Zest (2 large Oranges)

Gingerbread Cookies

Directions

Grate the Orange Zest; set aside.

In a large bowl, whisk together the flour, baking soda, ginger, cinnamon, nutmeg, cloves, and salt; set aside.

Cream butter and light brown sugar in a hand held mixer or stand mixer with paddle attachment on medium speed; 1-2 minutes. Do not overmix.

Scrape sides of bowl with spatula and mix for a 10 seconds.

Add egg and mix until incorporated. Scrape sides of bowl and mix for 5 seconds.

Add molasses and orange zest, and beat until incorporated, about 1 minute.

Snowflakes

Turn off mixer and add the flour mixture, and cover mixer with kitchen towel. 

Turn the mixer to low speed and incorporate. 

The dough is ready when it begins to clump around the paddle attachment.

This dough is sticky from the molasses.

Form into a disk shape, cover with plastic wrap, and chill in fridge for 1-3 hours or overnight.

Heat oven to 350°F.

Close-up

Use two sheets of parchment paper with dough in between and roll with rolling pin until desired thickness is reached.

Line baking sheets with parchment paper.

Cut out shapes and place on baking sheets and freeze for 10 minutes so they cookies hold their shape as they bake.

Bake for 10 minutes until they feel firm.

Wait 5 minutes and then transfer to wire racks to cool completely; about one hour.

For the Gingerbread Cookies recipe, please visit Fine Cooking:

http://www.finecooking.com/recipe/classic-gingerbread-cookies

Enjoy!

-Sophia/Two Frys 

Santa's Favorite Cookies

Santa's Favorite Cookies

Santa has been patiently waiting for his favorite cookies with M&M's and white chocolate chips. This year, I baked them and made it on Santa's nice list. He is forever grateful and will come again next year for more cookies, and to leave me lots of presents under the tree. I found green and red M&M's for this recipe and combined with the white chocolate chips, they are superb. With each yummy bite, you get M&Ms, white chocolate chips, or both. Don't forget to leave Santa a glass of milk and his favorite cookies. There is no mixer required for this recipe. Merry Christmas!

Yield: 3 Dozen Cookies

Santa's Favorite Cookies

Ingredients

2 1/2 cups All-Purpose Flour

3/4 teaspoon Baking Soda

1 teaspoon Coarse Salt

1/2 cup Vanilla Sugar (or Granulated Sugar)

1 cup Light Brown Sugar, packed

1 1/2 cups (1 1/2 sticks) Unsalted Butter, melted and cooled

1 Large Egg plus 1 Large Yolk, room temperature

2 teaspoons Vanilla Extract

1 bag (10 ounces) Milk Chocolate M&M's

1 cup White Chocolate Chips

Santa's Favorite Cookies

Close-up - yum!

Santa's Favorite Cookies

Directions

Heat oven to 425°F.

Line baking sheets with parchment paper.

In a large bowl, whisk together the flour, baking soda, and salt; set aside.

Just taken out of the oven

In a bowl, whisk together the cooled melted butter, light brown sugar, and vanilla sugar until combined.

Whisk in the egg, egg yolk, and vanilla extract until combined.

With a spatula stir in half of the flour mixture and combine. 

Stir in M&M's and white chocolate chips, and the remaining half of the flour mixture and combine.

Using a tablespoon or cookie scoop, form and place dough balls on baking sheets lined with parchment paper spacing 2 inches apart.

Cookies are cooling

Take the bottom of a kitchen glass and press gently to flatten the dough slightly. 

Repeat for each dough ball.   

Bake for 8 to 9 minutes. 

Cookies will look slightly underdone but they will continue to bake for a few more minutes when you take them out of the oven. 

Wait 5 minutes and then transfer to wire racks to cool completely. 

Adapted from Cook's Country | December/January 2021 | M&M Cookies.

Enjoy!

-Sophia/Two Frys

Tuesday, December 22, 2020

Grinch Cookies

 Grinch Cookies

I love reading How the Grinch Stole Christmas! by Dr. Seuss this time of year. Dr. Seuss vividly brought to life the grinch with a heart "two sizes too small" which is why I used a heart shaped sprinkle. You may have seen the movie starring Jim Carrey which is fun, but the classic book is my favorite. Everyone knows a grinch, or has at least heard of someone like this. These simple but tasty crinkle cookies are perfect to make for the holidays. This cookie uses cake mix and only needs a few ingredients. The cookies are chewy and have a cake-like texture. You don't even need a mixer, so the recipe comes together quickly and there is less clean-up. I used a little green gel food color to tint the dough, and pressed a red heart sprinkle into each cookie as soon as they came out of the oven. 

Yield: 1 1/2 Dozen Cookies

Grinch Cookies

Ingredients

1 box of White Cake Mix (I used Pillsbury)

2 Large Eggs

1/3 cup Vegetable Oil

1 teaspoon Vanilla Extract

18 Red Heart sprinkle decorations

1-3 drops Green Gel Food Color

Grinch Cookies

Grinch Cookies

Directions

Heat oven to 350°F.

Line baking sheets with parchment paper.

In a medium size bowl, sift the cake mix to remove lumps.

Cookie ingredients - easy peasy


In a large bowl, stir together with a spatula the sifted cake mix, eggs, vegetable oil, and vanilla extract until combined.

Using a cookie scoop or tablespoon form dough into balls about the size of 1 1/2 tablespoons, and place on lined baking sheets 2 inches apart.

If the dough is sticky, chill in the fridge for 30 minutes.

Press a heart shape sprinkles as soon as they are out of the oven

Grinch Cookies are cooling

Bake for 8 to 10 minutes or until the tops no longer look wet.

As soon as you take the cookie sheets out of the oven, gently press a heart into each cookie.

Let cookies set in baking sheet for 5 minutes and then transfer to wire racks to cool completely.

-Enjoy

Sophia/Two Frys

Monday, December 21, 2020

Spritz Cookies

 Spritz (Spritzgebäck) Cookies

I try to make Spritz (Spritzgebäck) Cookies every Christmas and they are one of the most popular holiday cookies this time of year. These cookies are also one of my favorite cookies to bake and eat. They also make great gifts for your loved ones. These buttery delights originate from the German word "spritzen" which means to squirt or spray. The cookies are made using a cookie press or pastry bag fitted with desired tip. The texture of the cookies are a little crisp when you bite into them and tender inside. I used my Wilton Cookie Press as this allows you to create cookies in different shapes. The cookie shapes hold well, and it is important not to chill the dough. Cookies should be placed on ungreased baking sheets. The butter ensures the cookies do not stick to the baking sheets. I use various sprinkles and tinted the dough blue, red, and green with gel food color. I prefer vanilla sugar instead of granulated sugar for a more bold vanilla flavor. 

Yield: 6-7 Dozen Cookies

Spritz Cookies

Spritz Cookies


Ingredients

3 1/2 cups All-Purpose Flour

1 teaspoon Baking Powder

1/2 teaspoon Coarse Salt

1 cup Vanilla Sugar (or Granulated Sugar)

1 Large Egg

2 tablespoons Milk

1 teaspoon Vanilla Extract

1/2 teaspoon Almond Extract 

1 1/2 cups (3 sticks) Unsalted Butter, softened

Colored Sugars and Sprinkles of your choice

Close-up

The tinted dough makes them so much prettier

Spritz Cookies

Directions

Heat oven to 375𐩑F.

In a bowl of your mixer with the paddle attachment, cream butter, vanilla sugar, and salt on medium high speed until light and fluffy, 1 to 2 minutes.

Scrape down bowl with spatula and mix again for 10 seconds.

With mixer on medium speed, add egg, milk, and extracts and beat until incorporated, about 30 seconds.

Turn off mixer. Add the flour mixture, and cover mixer with kitchen towel, and turn mixer on low speed and incorporate. 

The dough is ready when it begins to clump around paddle attachment.

If you are tinting the dough, separate it into bowls according to how many colors you need, and use a few drops of gel color and with a spatula combine.

These cookies are fun to make

Spritz Cookies are so yummy!

Spritz Cookies

Dough will be soft, but do not refrigerate.

Fit your cookie press with desired disk to form cookies or pastry bag with desired tip.

Press onto ungreased baking sheet, spacing about 1 1/2 inches apart.

Decorate with colored sugars and sprinkles if desired.

Spritz Cookies cooling

Spritz Cookies cooling

Bake until cookies are light golden brown around the edges, 8 to 10 minutes. 

Cool cookie sheets completely before you press more cookies on it. I stick the cookie sheets in the freezer for 5 minutes.

Cool baked cookies for about 5 minutes, and then transfer to wire rack and cool completely; about 1 hour.

Enjoy!

-Sophia/Two Frys